Showing posts with label blacksmithing. Show all posts

Friday, July 10, 2015

Another Last Demo


In June 2011  I declared I wouldn’t be doing anymore demonstrations out side my shop.  I just didn’t feel up to all the loading and unloading and other work associate with off-site forging.  I parked the trailer in the wooded area north of the studio.  It went unattended until I was persuaded to do another demonstration on a weekend of celebration in the Cottonwood Falls, Kansas area where our artist cooperative gallery is located.  The River Suites event was to be on Friday night and the Symphony in the Flint Hills and the Folklife Festival on Saturday.  The Prairie PastTimes artists decided to put on and open house with some demonstrators.

The first order of business was to get the demo trailer out to pavement so I could inspect it and put everything in order.  Trees had grown up around the trailer and through the tongue so it required chainsaw work to free it.  The tires had sunk into the soil but we were able to pull it out and roll it to the street east of my shop.

I pulled off he rotting tarp and found a wood rat had made a huge nest under the forge pan and has stashed a good supply of Kentucky Coffee Tree seeds in it’s pantry.  Friends helped me pull everything out and sweep before treating the wood plank floor with water seal.  The tires were in bad shape and the wiring to the tail lights didn’t work.  Two new tires were mounted and the wiring was replaced.
I still knew I needed help on the day of the demonstration so I called on a friend, the amazing Scott Miller, who has helped me with so many things over recent years and along the way has become a very talented blacksmith although he has little time to devote to it.  He agreed to help and on the big day did most of the forging work so I mostly just stool around and talked with visitors.

I wanted to work on “light-duty” items as it could have been a very hot day and we did’t have shade over the work area.  Additionally, rain was forecast so we had to be prepared to do something indoors in that case.  I decided we would work on forging various animal heads.  I could show the steps with modeling clay while Scott did the forging.  In case of rain I could do the same thing indoors and there would be no forging.  Also, I packed  some Show and Tell items.


After a week of dodging rain, organizing, repairing and packing, the  demo day arrived.  I was up at 0330 and it was raining heavily.  Scott came at 0630 and the rain stopped.  We did the final loading and drove to the gallery.  It took about a hour to setup and we were ready to forge at 0900 as promised.  Then we learned that the weather forecast had been so unfavorable that some of the Folklife Festival demonstrators had backed out so it had been cancelled.  They were supposed to have a blacksmith working also.

During the morning hours there were fewer visitors than we had expected but the weather continued to improve.  In the afternoon it was clear and there were lots of visitors strolling up and down the two-block long brick-paved Main Street.  The symphony worked out well too.

Optimistically, that was actually my last demo, but, I suppose I should never say never.  


One of our artist members, Eric Dyck, is a talented photographer among other things.  He took a lot of photos during the activities and posted some of our blacksmithing on the web here. Scroll down to June 14th to see the images. https://www.facebook.com/PrairiePastTimes  

Tuesday, October 8, 2013

Sprinkler Spike Base


I don’t know if this will help anyone, but I take a shot at it.  Some one might add “a long one with a limb in the way.”  I didn’t get much work done in the studio today because I had to run some errands and then do some fall yard work.  Some of the yard work was watering newly seeded lawn areas.  In Kansas, it seems we have to repair some areas of our lawns in the fall every year if we want them to look good after the ravages of summer.

So, to the point.  I was watering and noticed that I have, over time, made some helpful modifications to my tools with a blacksmith orientation.  This is the sprinkler retrospective.  First, I bought a standard lawn sprinkler at a local store and set it up.  I am fortunate to have very good water pressure, but the downside is that the pressure caused the sprinkler to flip over on it’s side and spray a tunnel into the ground or up into the air.  One of my granddaughters would call this the “dead bug” position.

I countered that problem by fabricating a base attachment with four forged spikes about 6” long which I could stomp into the ground and there was no way the sprinkler could flip over.  

It seems I’m not often willing to leave well enough alone and just say “It’s good enough.”  It didn’t take long before I came up with the idea of adding the tall handle so I didn’t have to bend over to move the sprinkler.  I was already using “hairpin bend leaf’ finial type stakes in my garden, so I welded one of those onto the base.  It worked beautifully and eliminated the stooping and bending effort.  

Next came the idea of turning the hairpin bend into a horizontal loop which would be a socket to hold a twist nozzle.  Sometimes I just rely on the sprinkler to do area watering and sometimes I use the twist nozzle to do more precisely targeted watering.  This accommodated both.  I guess my brain burned out at that point since I have made no further modifications.

I have noticed another potential benefit of putting a handle on the frame.  It assures that the sprinkler cannot tip over with the spikes pointed upward which could be a deadly hazard.

This is a special which has worked well for me.  I worry about things with sharp points and use this sprinkler cautiously.  I don’t sell it or recommend it for anyone else to use.  I hope that someone will come up with the next better version - Spiked-long handled sprinkler 2.0.


Saturday, September 28, 2013

How I Use the Coal Fire


I’ve used a number of coal forges but now I only use the side draft one inside my studio.  I’ve used the great bellows, the spiral gear hand crank fan blower and the several lever powered blowers of the same fan design.  They all work and have advantages and disadvantages.

I’m no longer in the business of doing shows so I’m just interested in effeceint use.  When I built my currently forge I placed a Champion electric blower http://www.centaurforge.com/Centaur-115-volt-PB-50-Blower-Variable-Speed-Eligible-for-Free-Shipping-See-Home-Page-for-full-details/productinfo/PB50VS/ outside the building on the porch to keep the noise level down inside and plumbed a nearly silent hand crank blower on the other side right next tot he forge pan.

In everyday use I use the electric blower turned down well below it’s maximum speed and rarely use the hand crank blower at all.  The tuyere is plumbed from both sides, electric and hand crank.  On the hand crank side there is a sliding blast gate.  On the electric side there is a hand wheel screw valve to further choke the maximum airflow.

In our normal work cycle the forge work is well organized and laid out so we go from one item to the next non-stop for two hours.  We discuss how the work will proceed and in the couple of hours we forge there is very little conversation.  Incidentally in the image “Hand Crank Blower” a can of black spray paint can be seen. We use the forge hood to make drawing in soapstone when needed and use the black spray paint as the eraser.

The electric blower runs essentially all the time maintaing a large hot fire.  The intensity of the fire is controlled almost exclusively with the blast gate on the hand crank side.  The only time the blower gets turned off is when we shift to a new project and have to get the new tools and workpieces arranged and when we quit.  Ken packs the fire, turns off the blower and allows a bit off cooling before raking out the fire pot.  This leaves plenty of coke ready for the next day and the clinker is in one solid ring, easy to separate from the coke.

I’ve worked with forges which require flipping the the blower motor switch off when a heat has been taken so that excessive fuel burn is avoided.  The disadvantage is that the heat falls off and to take another heat the blower must be restarted and the heat driven back up.  If the work being done requires some thinking between heats or if the smith is demonstrating and talking the additional time may actually be desirable.  However, if the work is a production run and there are multiple pieces being worked, it is a disadvantage.  Moreover, in my situation where Ken and I are alternating fire tending and forging with every other piece it would be a big waste of time.  We strive to bring each piece out at a orange/yellow high forging heat temperature unless lower world be better.

I didn’t learn to work the fire that way and that’s not what I teach when I have the opportunity but it is the way I do it now.  It’s probably always best to learn a craft the tradition way and modify the techniques so they fit the specific requirements of the shop later.

In a normal two-hour work run we don’t remove clinker until the fire is torn apart when we quit but we do turn the clinker breaker frequently and empty the ash dump a couple of times.  About the only time the quench can gets used is to put out any smoking coal after the fire has been pulled apart with the rake.

I don’t use wet coal on an everyday basis but I probably would if I was doing a lot of forge welding.  Also, a straight poker is the only tool I use to actually control the fire.

Take another heat.


Saturday, July 20, 2013

Back to Work


I’m finally back to making things.  After the recent coal trip I was cleaning t he bed of the pickup and managed to take a clumsy plunge down onto my left shoulder blade area.  Not since high school football days had I taken such a hit.  For the first week my arm mostly hung uselessly as the bruise spread down the upper arm to the forearm.

Fortunately we had a vacation trip to California planned so that worked well in my healing schedule.  When we got home a heat wave greeted us so I had an excuse to postpone forging a while longer.  It also gave me the opportunity to do a lot of lighter work assembling pieces which could go in the gallery.

Now the situation is looking good.  My left arm is about 90% back to work.  It looks like the heat will be with us for a while so I’m going to concentrate on assembling products which can be done in the comfort of air conditioning.  And it gives me time to think about things I might post on the blog.

When I was beginning my smithing business I set up to do commission work and had no plans to do craft shows or make products.  However, reality set in.  People saw some smaller things I made for our own use or for gifts and wanted one for themselves.  It didn’t take long before I had a line of products.  I’ve come full circle now and spend most of my time making things for the gallery which sell again and again and  much less time on commissions.

The repetitive nature of working this way has pros and cons.  The downside is largely related to boredom of non-creative work.  The upside is largely related to learning how to work more efficiently and perfectly.  It is interesting to study how to make design improvements, better tools and jigs and other aspects of production.

Some of my products have a really good sales record so I’ve naturally concentrated my efforts on those.  In the last couple of years It has occurred to me that it might be possible to sell my business somewhat piece by piece or product by product.  Each project has its set of dedicated tools and jigs and instructions which make it possible for any other blacksmith to make it.

Soon, I plan to go into more detail about my strategy for organizing each project.


Wednesday, June 19, 2013

Oklahoma Coal Again


I checked the date and it was almost exactly a year ago when I went to the coal mine for a load.  When I’m running low I tell Betty and she calls the scale house to confirm that they will have coal crushed to appropriate size for smithing and checks the price and makes sure our anticipated arrival time will work.  Everything looked good for a run today.  The price had gone up from $125 to $130 a ton.  US green folding money, of course.

To get a more useful price I have to figure in the hours and mileage and gasoline cost and lunch before we head back.  The actual cost is really $300 - $400 a ton delivered and in the bin.

Orio, one of my great helpers, did most of the driving.  The weather was perfect.  We saw many box turtles crossing the backroads in their summer migration and the wildflowers were beautiful.  The country was much greener than in the past couple of years when drought has gripped this region.  By the time we got to the mine at 1125 there was evidence of recent rain with water standing in the low areas.  

We weighed in and drove to the loading area for “chicken coal.”  We opened the bed and got back as a huge front end loader scooped up a partial bucked load, probably it could hold 10 cubic yards or more, and carefully filled the truck.  We leveled it off and worked it into all the corners.  This was too far to drive for a partial load.  The coal was wet and this made loading less dusty but we surely paid for some water.  We got the bed cover closed and weighed out, paid and were gone in about 15 minutes with just a bit over a ton.

Now it was time to look for a place to eat.  We found a nice buffet in Coffeyville, Kansas with salad, fried fish, ribs, chicken and great bread pudding.  I had never been in town when the Dalton Museum was open, but today my luck changed.  We spent an hour looking over the displays and I would definitely recommend it to travelers, especially those interested in western history and gun enthusiasts.  $3.50 is a bargain price.

One unanticipated pleasure for me was learning about the Patty Page connection with Coffeyville and seeing some of the material they have collected relating to her vocal career.

There was an interesting video playing which reenacted the events of the Dalton’s failed bank robbery.  One thing it points out is that this is an early example of average citizens who were just not willing to take any more of this thuggery.  In 1894 most people wren’t wearing iron on the hip any more so they rushed to the hardware store where guns and ammo were quickly distributed and they took up positions to block the escape of the gang.  The rest is history which you can see at http://www.daltondefendersmuseum.com

We were home before dark, still too stuffed to eat supper.  The weather is perfect to sit outdoors and enjoy the evening and later it will be great sleeping with the windows open, but tomorrow somebody is going to have to shovel all that coal into the bin at the studio.


Tuesday, February 26, 2013

Dental Checkup for Tongs


Last summer I took apart several pairs of old tongs which needed repair or reshaping to be useful but without time to go further I put them in a bucket and moved on.  Recently I came across another pair of tongs needing repair and decided to tackle all of them in one bite.  Bite seems like an appropriate word since it is mostly the bits that need attention.  I did a quick “dental checkup” on some other ones I use a lot and added a few more to the pile.

As I worked I really studied what I liked or didn’t about the mechanics of each one and tried to find the best way to describe those features so I would be more aware of what was really working for me.  There is a paradox in hand tool function.  If the tool is working perfectly, it is almost invisible.  It seems a natural extension of the hand - not something seeking attention.

So that led me to refining my tong vocabulary and being more specific about how I thought about their anatomy.  There seems to be quite a bid of variation in how blacksmiths describe tong parts and styles so what works for me isn’t going to necessarily appeal to others but here goes.

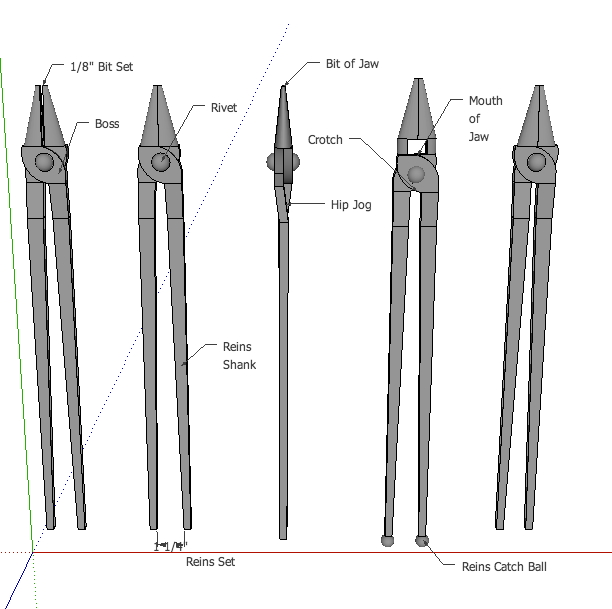
I think of tongs as having four general zones; the reins, the boss, the rivet  and the jaw.  The reins to tong length ratio determines to a large part the force which can be applied.  A boss, in general is a protuberance or enlarged area of a shaft.  In this case it is the hinge plate for the fulcrum - the rivet.  

The portion forward of the boss is the jaw.  The jaw has two divisions; the bit at the tip which usually has a specific shaped opening when viewed down the long axis.  The bit is often about an inch in length.  The gap between the pair of bits is the “set” of the jaw.  The rest of the jaw leading into the boss is the mouth area providing what ever space is needed for the object grasped.  Bolt tongs have a cavity to accommodate the bolt head.  The mouth can be in straight alignment with the long axis, offset, or considerably offset - goosenecked.

The boss area largely controls any wobble tendency and gets the brunt of the frictional wear.  Using a relatively large rivet, 3/8” to 1/2” diameter, and making the hinge plate an inch or more in width provides a lot of mechanical stability.

The gap between the reins where they join the boss is the crotch.  I like that to be about 1/2” so the tongs hang nicely on a bar rack.  That gap is the “set” of the reins.  The inch or two run coming off the boss is the hip area and this is where the jog of the reins occurs to bring them into parallel with the long axis.  The long run of the reins is the shaft and the terminal area is the catch region.  An actual catch may be absent, a short terminal jog away from the long axis or some actual mass such as a ball.  Sometimes it is a ring on one rein which flips over and catches on the other to act like a tong clip.

So that is the terminology I used as I went through the repair process.    I made a number of observations related to the mechanics and about the specifics of bit design which I’ll post later after I’ve had more time to make more sketches for illustration.  Later still, I plan to do a segment on tong making.

Back to work - living the dream.


http://www.persimmonforge.com/

Saturday, February 9, 2013

Sharing with 3D Warehouse


Yesterday I decided to figure out how to share files on the Trimble 3D Warehouse (powered by Google). http://www.sketchup.com/product/3dwh.html

I have frequently searched their archive for models to help me illustrate ideas so I wanted to try and give some pay back by posting a few visualizations I’ve worked out.  I added two versions of my treadle torch and one file of my platen table. 


I think I followed the instructions carefully but I’m not sure that one of the items is correct -  “In SketchUp, hide your lines and profiles for a cleaner screenshot. View -> Edge Style -> uncheck Display edges and Profiles.”

When I downloaded my files to see how they worked I had to check the Edges and Profiles again to make them look the way I like but I’ve noticed when I’ve down loaded other files they usually arrive with Edges and Profiles already checked.

Experience is a good teacher so I’ll keep experimenting and anticipate that I’ll soon understand the process better.  It took me a couple of years of use to become really fluent with SketchUp but it has been well worth it for me.  Using the axiom that “a picture is worth a thousand words”, has paid off when illustrating ideas for clients and with other types of design work.

For those who are not familiar with SketchUp is may seem a bit intimidating at first.  One way to get started is to visit the 3D Warehouse and do a search for “forged” and study the results.  After a while they will get the hang of modifying the searches to more specifically find illustrations.  This is an example of a nice swage block.


Friday, January 25, 2013

Pedal Hammer Seat Bracket Modification


I have been working on some small botanical elements, grape leaves, sunflower centers and such using the pedal hammer and veining tools.  The machine I use frequently is a prototype model and had a old style seat bracket which didn’t allow enough foot clearance when sitting down and getting up.  Every time I sat down and wiggled my left foot through the narrow space I would think, “I should fix that.”  However, that thought was immediately followed by, “That will take thirty minutes and be a hassle.”  So the problem lingered until yesterday.
I finally got an adjustable wrench and took the seat and bracket off, made two cuts and two welds and put it back on in thirty minutes.  A big improvement.  So the lesson, for me, is when building the bracket try to keep a shoe length distance between the anvil post and the seat bracket frame.
Now every time I sit down I’ll think, “I should have done that two years ago.”


Wednesday, January 9, 2013

The Coal Forge Door


There is no damper in my coal forge, it would be possible for a lot of cold air to come down the flue and enter the shop on these cold winter nights.  A solid door keeps that from happening.  It is an important detail which I didn’t illustrate in my previous posts about the forge construction last May.

The door panel itself is the drop from the water jet cutout for the door opening.  The material lost in the kerf is just enough to make the door fit easily.  It is 7 gauge HRS.  I added some side strips in the front to serve as stops.  A hole was drilled in the center of the arch canopy so I could drop a tapered keeper pin which matched up with a 1/2” pipe barrel welded to the door front.  The keeper is attached to the door by a small chain about two feet long.  That keeps me from losing it.

I still had a little trouble getting the door centered when putting it back in place so I welded two bottom guides which are easy to feel and provide an only-one-way fit.  

It works perfectly now but there may be better ways to accomplish the same thing.  For one thing, the door panel of 7 gauge weighs a lot and a thinner gauge would work as well.  Also, a damper mechanism might be a more convenient solution.


Wednesday, January 2, 2013

Bealer’s Bellows Hinge Drawings


Today I thought it might be helpful to post my interpretation of a couple of Alex Bealer’s drawings depicting some of the leather hinging.

The most interesting detail, to me, was how a blocking board was used instead of a leather restraint tether to limit the flapper valve opening.

I thought the Iron Angel blog was a good reference explaining bellows operation and how to make a light weight bellows for using in demonstrations.
The pictures are here:


Thursday, November 1, 2012

Small Piece Tongs


I have a pair of old tongs I acquired from some flea market quite a few years ago.  I probably paid a dollar - I really don’t recall.  They were made from approximately 3/8” stock.  The jaw was flat and the reins were drawn down to about 5/16” and they were very pitted.  They looked so fragile I anticipated they would break after a short period of service.

Well, I was wrong.  It is ten, or so, years later and they still work as well and when I acquired them.  They are only appropriate for light duty work so the mechanical strain on them is small.  I am about to move into a phase of work where I will be handling a large number of very small pieces and these tongs are ideal for the task. 

In the usual daily work plan we run a hot coal fire and Ken and I move pieces through as fast as we can. We alternate pieces. To me this is an highly coordinated activity.  It has evolved organically, without a real dialog, strategy or mission statement.  We have just worked together for a long time.  Most of the time the work space is noisy and we wear ear plugs so very few words are exchanged while forging.

Although I can’t imagine working any more intuitively and congenially than we do sometimes we seem to manage to test each other with our differences in fire management strategy.  Ken has a way of working very effectively with a growing clinker.  The fire grows hollow and the work pieces migrate lower and lower into the very hot but oxidizing zone.  I try to hustle along and get more and more pieces into the fire.  It is really pushing it to manage a lot of small pieces in a risky hot fire.  His tendency would be to work fewer pieces in exactly the right location while my inclination is to get the clinker out and make the fire deeper.  Some how we make it work.

One of the things which makes it work is having enough of the right tools.  I can see that this single pair of old tongs is not going to be enough with the jobs coming up.  At the least we each need a pair and realistically we each need two pair because sometimes one gets misplaced.  Fortunately this is a problem that can be quickly solved.  I cut six pieces of 3/8” round 5” long and we went to work.

In one heat using the power hammer with a combination die, I flattened a two inch flat blade using a 1/8” stop and a top hand-held flatter.  On the second heat I rotated the stock 90º and flattened a 1.5” segment on the drawing die to make the box area.  On the third heat with a 5/16” stop I drew down the takeoff region of the reins for a couple of inches and did  the offsets of the blade and reins from the box.  On the fourth heat I punched the rivet hole.

In actual practice I made one piece.  Ken watched each step and I laid the finished example by the anvil and Ken finished the other five. They went into the tumbler when we left last night.  

Today I put in the rivets and used torch heat to do the final adjustments.  I also welded a punch drop to the end of each rein.   It took about an hour to finish all three.  If I could have just looked in a catalog and found exactly what I wanted I might not have bothered to make them but I’ve never seen this light weight style offered commercially.  So the bottom line is, I have what I need at probably about a third of what it would cost to buy if they could be found and it didn’t cost me enough time to really interfere with the work in progress.  I’ll call it time well spent.


Friday, September 7, 2012

Fly Press Handle Modification


My press came with a single handle.  I have found that three handles work better for me.  I fabricated the additional two handles from a short piece of 1” thread rod welded to about a foot of 1” pipe.

I still didn’t like the tendency of the handles to work loose in the threaded sockets of the fly wheel so I welded a bolt extension to the top which allowed me to attach a jam nut with lock washer.

I also found that adding a 2” ball to the handle bottom end made operation much easier on the hands.

These are all small things but everything that makes the day go easier I appreciate.


Wednesday, August 29, 2012

Making Work Stands


I have made a number of work stands and the most satisfactory design, for me,  is made with a base of 16” to 20” wide plow disc, a vertical section of pipe or tube 16” to 20” tall with a hole drilled near the top where I weld a nut/bolt/T-Handle assembly as a locking devise.  The top vertical section is made from a pipe or tube which will fit comfortable inside the base tube.  The transverse top is made from 1” square tube or round tube 8” or more wide with a couple of end vertical stubs.  The easiest way to make those is to cut three walls of the tube and bend the stubs up and reinforce the remaining wall with a weld bead as shown in the image.

The top width depends on how the stand will be used.  Stability results from keeping most of the mass concentrated toward the floor and keeping the transverse top width to a minimum so the work is centered over the vertical shaft reducing the moment arm.

Most were made in the early days and almost all the components were easily attainable scrap.  Each band saw has two, each drill press has one, the forge has two so that makes eight.  When I was cutting a lot of longer structural steel to build equipment for the shop I made a couple of stands with 2” rollers, scrap from a food processing line.  They were OK for that specific purpose but I no longer use any.   The rolling feature is now mostly annoying.


Sunday, August 26, 2012

Tools Drive the Work ...


I’m pretty sure when I was starting to learn blacksmithing I was thinking “work drives the tools”.  This is a version of the “chicken or the egg” conundrum.  I wanted to heat and move iron to make creative things I was imagining so I needed to make and acquire the necessary tools.

It wasn’t long before I began to see it the other way around.  Since I had such and such tools, I could do so and so with them.  Tools were driving the work possibilities.  Each new major tool seemed to greatly change the prospects for work.  Treadle hammer led to the Little Giant which lead to the Hydraulic forging press.  There were many smaller intermediate steps but those three brought the greatest transformations.

Of course it is an equilibrium equation where the back and forth is inseparable.  Maybe it is actually more like the rock-paper-scissors game.  Experience/Skill allows creation of a Tool Inventory.  The Tool Inventory facilitates the production of Creative Work.  Creative Work grows the Experience/Skill.  One never really gains an advantage over the other and the creative cycle is unbounded.


Wednesday, August 22, 2012

Taking Small Bites


When working new projects that involve multiple steps or processes I like to spread the work out over several forging sessions.  I set up work so that one or two steps are done each day.  That gives me time to study the progress and make any needed plan changes.

When a project has been well worked out and the routine established it’s a different story and I work start to finish at one session.

I organize a queue of work so that if I run into a problem with one job I can lay it aside an move up another and keep up a steady pace of work.  I don’t have to stop and solve the problem until later.

Lately this strategy has been particularly noticeable as I have been doing a lot of die making.  Forging the positive form in one session.  Sinking the positive into negative blanks in the next session.  Cleaning up and relieving edges in the negatives and refining details.  Then working back to forging a more refined and detailed positive.

That back and forth work can run over several days but only take a few minutes of each day.  The small bites eventually produce the desired result - incremental progress through patient and persistent fiddling.

There are a number of other examples in blacksmith work where it is important to proceed slowly and carefully so as to not stray too far in one direction and find it difficult or impossible to recover control.  I can faintly hear the teacher saying, “Haste makes waste.”

Sunday, August 12, 2012

Making Power Hammer Stops


Maintaining the full thickness of stops for the power hammers is more of a challenge that with the hydraulic forging press.  The repeated striking of the stop over time by the power hammer ram die tends to diminish the thickness through cold forging even when they are made from tool steel.

I have made a number of the stops from railroad clips.  They are plenty tough but apparently not as hard as the 4140 dies in the hammers.  I found this source which suggests they are about 1050. http://forums.dfoggknives.com/index.php?showtopic=16220

To make stops I heat the clips and straighten them out.  The hydraulic press works well for that.  Next, I forge a tang approximately 2” long to fit the die socket or smaller if I plan to fit a piece of 1” square tube over it to finish the tang shape.  Then I forge about a half inch of the tip to the desired thickness and let it get as wide as it naturally gets so there is as much flat surface area as possible without going to extra work.

Under normal working conditions the working end of the die should not take a lot of abuse but, over time, the tips do get a little thinner and 5/8” eventually becomes 5/8”-weak and then 9/16”-strong.

My original idea was to reforge the stop when it became thin, pulling more mass out from the body area into the working area. I’ve done that about four times but, in practice, it has been handier to keep the strong/weak dies and just make a new nominal dimension one when a critical thickness is needed.

The current collection contains about 25 stops from about 16 gauge up to about 1.5”.  I have them arranged on a carousel rack near the hammers.  There is a secondary rack for about a half dozed stops very close to the primary hammer to hold the ones to be used in the current forging cycle.

`


Saturday, August 4, 2012

Collected Tool Steel

At the time I was beginning blacksmithing, there was an enormous volume of antique agricultural equipment being scrapped and our area is primarily agricultural so I had easy pickings.  I was also lucky to be a friend of the scrapyard owners and operators so a lot of the time they didn’t charge me anything.  They charged for the type of material which was their high profit variety - massive and dense or didn't require being worked (disassembled, cut, crushed) before being loaded for hauling.
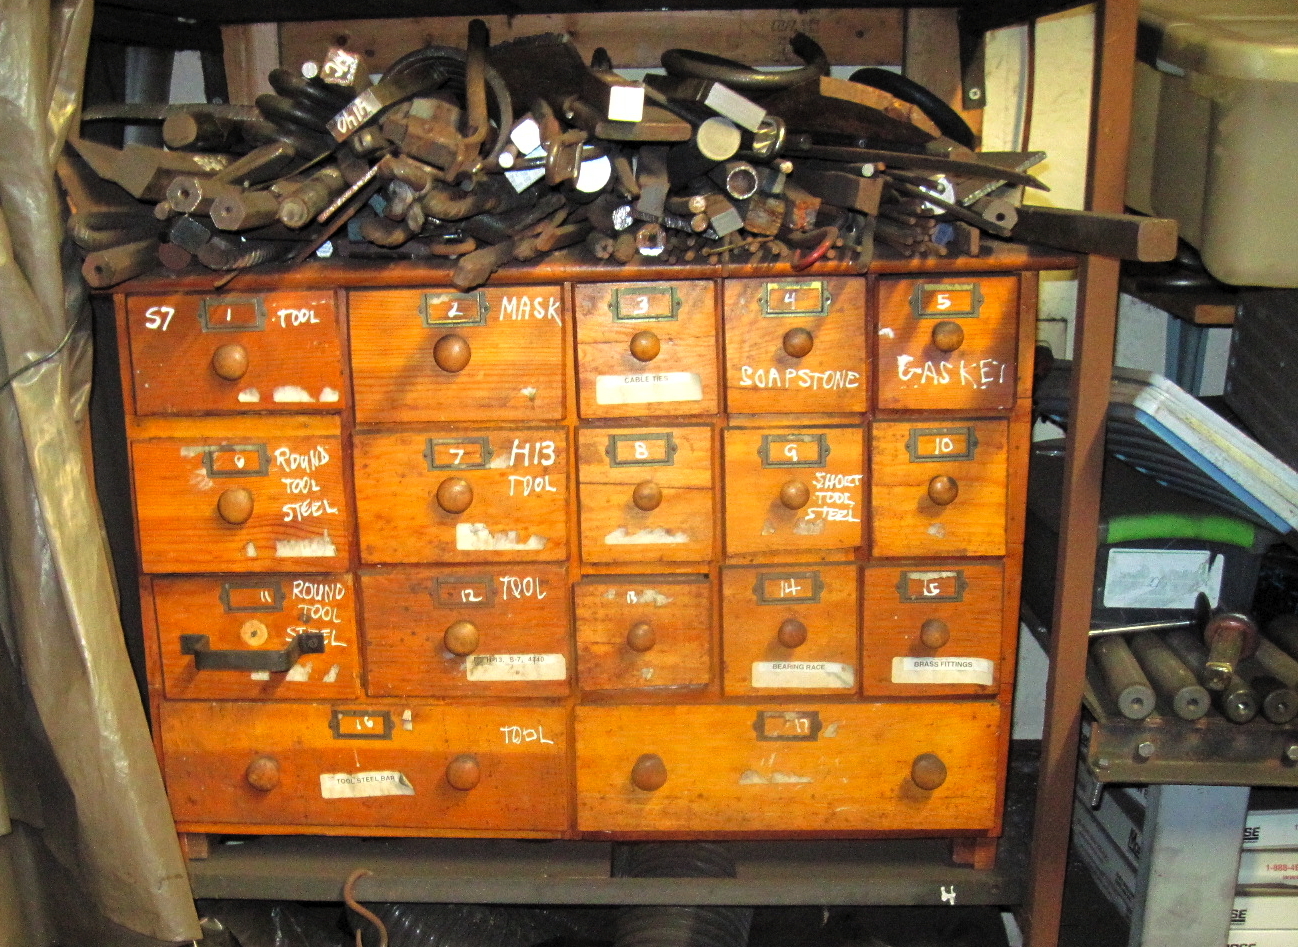
Mostly I picked up mild steel and wrought iron but from time to time built up a collection of steel suitable for tool making.  I call this “Uncertain Alloy Scrap.”  It didn’t come with a pedigree so I have learned the properties through irregular metallurgical experimentation.  The spark test on a grinding wheel is sometimes useful.  Mostly my testing involves seeing how quickly the piece draws heat - what is the terminal heat color - how hard is it to move with the hammer.  After cooling it is tested for it air hardening suitability.  If it doesn’t hold up to an air hardened edge test it is reheated and oil quenched.  If it still won’t hold and edge, it isn’t tool steel for me.  I never want to rely on a steel which needs water quenching.
So with practice I have found how to use pieces from this list of things I’ve collected:
Hay Rake rod
Harrow tines, spear type
John Deere Rotary Hoe tines
Hay bale spear spike
Deep cut plow discs
Caterpillar track pins
Road Grader blade
Jack Hammer Bits and Hex drill rod
Vehicle Axles, Tie rods and Coil and Leaf spring stock.
Trenching bits (excellent for hardy tools)
Lawnmower blades
Railroad rail clips and high carbon spikes.
I have hoped to find a Forklift blade to cut up for die stock but have never seen one in a scrap yard.
If I have a project I feel is really important I will use a known alloy like 
S7, H13 and 4140.  I don’t live in a large manufacturing area so it is hard to find known alloy tool steel drops.  At blacksmith meetings I have picked up some at scrap prices but when I have to buy it from the online suppliers the expense really bites.
Sadly, the old scrapyard is now closed.  But, my good fortune was to build up a big pile during the easy times.  Almost all of my tool steel is shelved inside the shop now. The outdoor pile has dwindled over the last 15 years and the other day I noticed I could probably put all of it in the bed of my 1995 Dakota and haul it off in one load but what’s left will probably be enough for my needs.