Showing posts with label Power hammer. Show all posts

Monday, June 2, 2014

Moles and Ground Vibration


I’m told the Eastern mole is the only variety found in Kansas.  Moles like loose loamy soils containing lots of insects which nicely describes my location in the Neosho River flood plain.  The are classified as insectivores and consume lots of earthworms, cutworms, beetle grubs and millipedes and more.  Apparently in captivity they are more omnivorous.

Before I built my studio the lawn would be heaved up from time to time with mole hills and feeding runs.  It wasn’t a big deal here but when I was a kid in Missouri our yard was regularly and plentifully marked by mole hills and feeding runs which were unsightly and made mowing difficult.

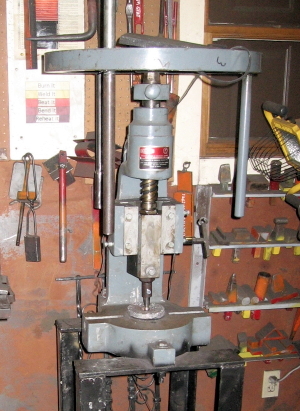
I have heard they don’t like ground vibration but most of the articles I read recently say that ground vibration devices are not effective or perhaps only effective over a very short distance.  I recall seeing mole activity around the shop until I installed a fifty pound Little Giant power hammer.  When it went into regular use there were no more visible mole runs near the shop.  I still see some runs near the creek which is a couple of hundred feet away.

So, I may be going out on a limb here, but, if you have moles and want to run them off, try installing a power hammer.


Wednesday, May 7, 2014

Bernie’s Helve Hammer

I think the most fascinating piece of equipment I saw at the BAM conference was a helve hammer made by Bernie Tappel.  He made it since the last conference and I think this was the public debut.  He said he made it almost entirely from scrap he had on hand.

I’m going to study it and see how something similar might apply to my work.  It looks like a very appealing engineering challenge.  As Robert Oppenheimer said, “It is a technically sweet project.”


I hope Bernie will write an article for the BAM newsletter about it.


Thursday, January 23, 2014

Die Retainer Pin Modification


The quick change die holder system on my power hammers has worked very well for years.  After I got the rhythm of using them worked out I rarely dropped a keeper during a die exchange.  However, there was one with one problem.  The drop pin which locks the key in place is tethered to the key and the tethers have a tendency to break.


The first tethers were long leather strips. However if a hot work piece contacted the leather it would burn through it.  Later I tried a heavy nylon cord and that worked even less well for the same reason.  The current tethers are steel chain.  They have worked so well I think they may be the end of the story.

Keeper Key and pin in locking position.


Keeper key and pin in storage position.

Tuesday, December 10, 2013

True, Strong and Weak


Several years ago I helped one of my sons install siding on his new home addition.  He ran a framing business and his main helper was also a carpenter.  The took turns measuring and cutting lengths of siding boards.  It was interesting to see how quickly and efficiently they worked.  Right away I noticed something unfamiliar to me in their conversation.  The person measuring would call to the person using the sliding miter saw the length to be cut.  I heard terms such as “Six foot, four and a quarter weak.” Or, “Seven foot, two and five-eights strong.”

I don’t think I ever discussed it with them but it impressed me enough that I remembered it and started using the terms as I did measuring.  It is easier to read the tape to the nearest eighth inch mark and use strong or weak to signify which sixteenth is the cut line.  I suppose another pair of modifier terms such as short/long or shy/proud could be used too.

I use this method almost every day when working with the power hammer.  A lot of forging is done to a particular dimension so I have a set of stop dies which range from 14 gauge, 0.0747”, (I had to look that up), to 1.5”.  Even though the stops are made from some sort of tool steel, over time they thin.  When that becomes noticeable the stops is designated as “weak.”

For instance, a 3/8” stop will become 23/64” in thickness after some use. When it becomes visually noticeable the die is labeled “3/8” weak.”  After further use the stop will thin to 21/64” and that is closer to 5/16” than 3/8” so it should now be designated as “5/16” strong.”

For my work, that difference doesn’t often make a practical difference.   Close is good enough in horseshoes, hand grenades and most of my forging.

Thinning of the working depth.

Label of thinned stop. 
Stop selection for a forging session.

Monday, December 9, 2013

My Power Hammer Depth Stop


Last week I made the elements for two console tables which required forging 1” square bar, breaking the corners and drawing a taper about a foot in length between the upper part of the leg down to a 1” foot.  To ensure that all eight were quite similar I used an adjustable depth stop on the spare tire power hammer.

The tool consists of a tang of 1” square tube which fits into the left-hand die socket on the power hammer; the 9/16” round slide shaft with with 1/8” x 2” x 8” flat bar stop arm; a 3” piece of pipe guide tube which closely fits the slide shaft and has a T-handle welded bolt/nut screw lock; and a 6” piece of 1/4” pipe which is a cheater pipe for tightening the T-handle screw onto the slide.  The tang also has a T-handle welded bolt/nut screw lock to hold the cheater bar securely when the jig is stored.

When forging the legs, I first broke the corners giving them a noticeable chamfer.  Then I set the depth stop as short as possible to isolate the foot and used a 5/8” thickness stop in the right-hand die socket.  After all eight feet were forged I set the depth stop to about 12” and worked from the foot up about 6” with a 3/4” thickness stop in place.  Finally, I removed the 3/4” depth stop and worked free-hand to smooth the taper transitions for a distance of about 12” from the foot.


If I was doing this an a pretty regular basis I probably could have done it all by eye and come out looking about the same but this assured it would go quickly and smoothly.  I didn’t want to mess one up because I was working with the last of my 1” square stock on hand.  I seldom stock more than 20’ of bar stock that large.  With short notice I can get it when I need it.

Cheater bar tightening the lock screw.
Depth stop set for the short work. 
Depth stop set for the long work.
The foot-leg taper.
Eight legs coming out of the tumbler.

Friday, September 6, 2013

Hammer, Bump & Squeeze


The most powerful tools in the studio are the power hammers, the hydraulic forging press and the fly press.  Each has a distinctly different way of delivering force which is very helpfull in different circumstances.

I recall Abraham Maslow’s, “If all you have is a hammer, everything looks like a nail.” http://en.wikipedia.org/wiki/Law_of_the_instrument  I became acutely aware the the differences when I really became interested in die making.  

The fly press is a precision instrument which can make detail very well and is easily hand controlled because it is a slow operation.  It’s down side compared to the two other big tools is that it is less powerful.

The hydraulic forging press produces a squeeze without any bounce, but, because it is slow it can’t coin as well as the power hammer.

The power hammer is best for coining but because it has some bounce it is not as easy to control as the other two.

When the only big tool I had was the power hammer every die was designed to work with it.  After I built the forging press I could immediately see I needed to make some changes and move to a progressive die strategy where some preforming mass was done with the press so the coining finish work would be easier on the power hammer.  It has taken a couple of years to get this nearly perfected and it has been very helpful in extending design options.

In almost every project I try to get as far as I can with the power tools before I have to resort to hammer on anvil.  It is in some ways the most intimate and pleasurable phase - the finishing - but it is also the part which is hardest on my old frame.

I’ve often said, “My work determine my tools and my tools determine my work.”  In this circular process my work has evolved to use a lot of dies.  I have perhaps a couple of hundred which I have made to do very specific processes.  I’ve learned a lot how to make these dies as I climbed the learning curve. I’m thinking that I should try to pass on some things I discovered which helped make the process better and easier. Last September, I posted an introduction to the subject.  http://persimmonforge.blogspot.com/2012/09/introduction-to-blacksmithing-dies.html  Now, I’m planning to move on from there with some further details and illustrations.  Probably, it will be somewhat jumbled as I don’t have enough time to get it better organized now.  I’ll try to explarin how each of my power tools related to my die making proceedures.  We’ll see how it works out.


Sunday, August 12, 2012

Making Power Hammer Stops


Maintaining the full thickness of stops for the power hammers is more of a challenge that with the hydraulic forging press.  The repeated striking of the stop over time by the power hammer ram die tends to diminish the thickness through cold forging even when they are made from tool steel.

I have made a number of the stops from railroad clips.  They are plenty tough but apparently not as hard as the 4140 dies in the hammers.  I found this source which suggests they are about 1050. http://forums.dfoggknives.com/index.php?showtopic=16220

To make stops I heat the clips and straighten them out.  The hydraulic press works well for that.  Next, I forge a tang approximately 2” long to fit the die socket or smaller if I plan to fit a piece of 1” square tube over it to finish the tang shape.  Then I forge about a half inch of the tip to the desired thickness and let it get as wide as it naturally gets so there is as much flat surface area as possible without going to extra work.

Under normal working conditions the working end of the die should not take a lot of abuse but, over time, the tips do get a little thinner and 5/8” eventually becomes 5/8”-weak and then 9/16”-strong.

My original idea was to reforge the stop when it became thin, pulling more mass out from the body area into the working area. I’ve done that about four times but, in practice, it has been handier to keep the strong/weak dies and just make a new nominal dimension one when a critical thickness is needed.

The current collection contains about 25 stops from about 16 gauge up to about 1.5”.  I have them arranged on a carousel rack near the hammers.  There is a secondary rack for about a half dozed stops very close to the primary hammer to hold the ones to be used in the current forging cycle.

`


Monday, February 27, 2012

Selling My Little Giant


I believe I’m getting pretty good at making power hammers, at least, good enough for my needs. So, with some reluctance I moved out my trusty 50 pound Little Giant and replaced it my shop built 75 pounder with a smaller foot print.


After some delay, I advertised the machine and soon had a couple of interested buyers.


When the deal went through I experienced some unexpected feelings of “sellers regret” which brought back memories of a deal I made in 1979 to buy a riding mower. Some of the details have slipped my mind but the story goes something like this. Circumstances forced a neighbor to move to another state and it wasn’t feasable for him to move his relatively new riding mower with him. I was in the process of moving to a larger property which could actually justify a riiding mower but I was also short of cash.


The owner approached me about the proposed sale. He offered to sell it for about 40% off the new price

and I knew it was nearly new and he was compulsive about it’s manintenance. It was like his mechanical pet. I told him I thought he could run an ad and get a better sale. He said he didn’t want to do that because he wanted me to have it because he wanted it to go to a good home which didn’t make much sense to me.


Largely due to his persistance, I signed a note giving him one third down, a third in six months and the final payment six months after that - no interest.


Well, I used the mower for years, mowing 2 acres of rough pasture in the process of creating a lawn so I can’t say it had an especially easy career, but overall I think I gave it a good home.


Now comes the Little Giant sale and I am surprised to experience feelings about wantng my pet to go to a good home. I didn’t ask to get back all I paid for it, the extra parts and the features I added. I served me well for years. That’s worth a lot.


The sale went fine and I think it will have a good new home in Indianna.


Thursday, December 8, 2011

Buying My Little Giant


I recently put my 50 pound Little Giant up for sale and when visiting with a prospective buyer I recalled something which struck me funny and I have retold the story a lot of times.


I was in Grapevine, Texas June 1-3, 2001 attending the IronFest Blacksmithing Regional Conference when I saw a 50 pound Little Giant chained on a vendor’s trailer. I had never used one but was interested and I lingered for some time studying it and trying to determine it’s condition. I was startled by a fellow who came up behind me and put his hand on my shoulder and said, “That the one you want.” “Really”, I said, “why?” He replied, “Because it will kill you instantly - no suffering.”


Well, that wasn’t exactly the encouragement and advice I was looking for. Eventually, I met Mike George from Alva, Oklahoma who owned the machine and was offering it for sale. I explained that I didn’t know much about them and he explained he didn’t know much about that particular one because he hadn’t done any rebuilding but had just confirmed the motor would run it.


After a while we worked out an arrangement in which neither of us had much to lose. I’d pay him when he delivered it and If I tried it and wasn’t satisfied he’d take it back and pick it up and repay me. Everything worked fine and that was the beginning of a nice friendship and ten year of enjoyment using my Little Giant before I started making my own power hammers.


It was also a very enjoyable conference, a bit hot, but Frank Turley, Mike Boone, Wendel Broussard and Jeff Mohr gave nice demonstrations and I learned quite a bit and was lucky to buy the Boone-Broussard collaborative grille at the fund-raising auction. It’s a really nicely executed piece and I’ve enjoyed having it on the wall in our entry hall where I see it every day.


http://www.persimmonforge.com/

Thursday, August 4, 2011

Too Hot To Forge


It’s been over 100º almost every day for about three weeks and 112º yesterday. I was about to say, “I wish it would let up”, but that would leave the opening for someone else to quip, “If wishes were horses then beggars would ride.”

In the past I had a rule that I wouldn’t forge on days when the temperature was predicted to reach 90º at 3 PM, the usual peak forging time. I’m far enough behind schedule this year that I’d be willing to raise that to 95 º but haven’t found one of those days recently.

It has been necessary to turn to other small jobs which can be done cold or with torch heat. At least it’s an opportunity to make the things I put in the Prairie PastTimes gallery. I only make a few items in the category of “Colonial Reproduction” or “Old Time Ironwork”. They aren’t big sellers on the Great Plains, so far removed from their main historical base. There are a few pieces like the sawtooth trammel, sticking tommy and the fat lamp in which I see a sort of primitive engineering elegance which appeals to me. This week it was time to make fat lamps.

I make one simple style with an open pear-shaped pan, rived to a vertical bracket which ends in a swivel made from a forged square nail attached to the hook/spike hanger. I works as poorly to produce light as any of the similar historical types. These crude, but portable, lighting devices, burning a tallow soaked wick, were first made of pottery and later bronze and iron and spanned a lot of history from the campfire to the oil lamp and candle.

As this is a project which is repeated and made in batches, it is heavily jigged. I first made a die set to use in the power hammer to forge the pan and later adapted it to the hydraulic forging press. That was the only fairly hard part to get perfected. Now I can deep draw the pan from either a 16 or 14 gauge mild steel blank which is heated in the coal fire to scale. The perimeter excess is trimmed away and I use the press once more to true the form then tumble. I touchmark the bottom of the pan and punch the rivet hole in the back of the pan directly opposite the wick trough.

The other components are not complicated but I’m not an expert when it comes to making square nails so that is more time consuming than it should be. I have found every part of the project to be easier to accomplish with torch heat except for the pan forming. Doing anything this repetitive can get boring for me so I work at it off and on between other design and test work. This week I managed to complete 18 lamps.

It doesn’t appear that the coming week will be any cooler. Maybe that will be sticking tommy week - anything to stay cool. I heard that a fellow saw a dog chasing a cat and they were both walking.

http://www.persimmonforge.com/