Friday, January 25, 2013

Pedal Hammer Seat Bracket Modification


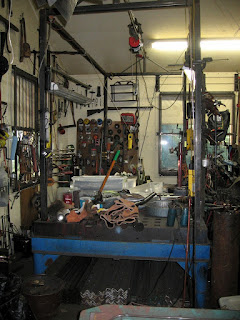
I have been working on some small botanical elements, grape leaves, sunflower centers and such using the pedal hammer and veining tools.  The machine I use frequently is a prototype model and had a old style seat bracket which didn’t allow enough foot clearance when sitting down and getting up.  Every time I sat down and wiggled my left foot through the narrow space I would think, “I should fix that.”  However, that thought was immediately followed by, “That will take thirty minutes and be a hassle.”  So the problem lingered until yesterday.
I finally got an adjustable wrench and took the seat and bracket off, made two cuts and two welds and put it back on in thirty minutes.  A big improvement.  So the lesson, for me, is when building the bracket try to keep a shoe length distance between the anvil post and the seat bracket frame.
Now every time I sit down I’ll think, “I should have done that two years ago.”


Treadle Torch Followup


Imagine what a surprise it was to open the January/February Issue of NOMMA’s Fabricator and see the article “Hot Treadle Torch” by “Uncle Bob “ Walsh just after I had written about rebuilding mine.

As I thought about what seemed like a coincidence I decided that there may be less serendipity involved than I first thought because I had recently been reading the articles in the fabricator he had been writing about making acanthus leaves.  That may have started me on the track of reworking my treadle torch.

He mentions that he saw Wendell Broussard use a treadle torch at an ABANA demonstration.  I wonder if it was the same occasion in La Crosse, Wisconsin when I watched Wendell for my second time.

I posted a couple of pictures of Wendell’s work then.

The Fabricator article is well worth reading.  Also, his explanation of the pros and cons of gas and coal forges is well done.

I did notice the system described is a bit different from mine.  First, I do use acetylene and oxygen and don’t have a soot problem if I keep the pilot light flame carefully adjusted. And secondly, I don’t generally use the rosebud tip but use  a cutting tip instead because my setup is used more often in the free hand torch mode than the treadle mode.  I, too, use the quick couplers and the Smith company gas saver and believe they work well.

I found a few more images of Wendell's work from the 2002 conference.


Friday, January 18, 2013

Treadle Torch Plans


A year ago I wrote about using a gas saver with the torch.  I intended to post a set of plans showing how I made mine but never got that done.  Then I thought about rebuilding mine because it had some problems so I started making some sketches to see if I could find some improvements.


The first decision involved whether the setup would be fully dedicated to treadle operation or would it also accommodate freehand torch use. I chose the latter as that is the way it has worked out to be most useful in my shop.

In this dual setup the torch is designed to hang from the shutoff lever of the gas saver when in freehand mode and to hang from a hanger fixed near the pilot light when in treadle mode.  A weight is hung on the gas saver shutoff lever when in the treadle mode.  The weight is enough to power shutoff but still easy to lift with toe pressure on the pedal.

The next decision is whether to place the torch tip near the gas saver pilot as factory built or to move the position of the pilot light by adding a copper tube extension.  I decided to adapt to the pilot on the devise without alteration other than add a hose clamp handle to make adjusting the pilot flame easier.

After I checked a couple of references on the internet


and aided by my previous experience I started building from the ground up. I decided my comfortable working height was about 44” in the treadle mode.  I was satisfied with the stability and maneuverability of the plow disc base on my current setup so I started with another 16” disc.

Next the Primary Post was welded to the center of the disc in true vertical position.  After that I worked out a pedal-lift mechanism with about 2” of upward travel and the work height adjustment.  That proved that there needed to be the additional 1” space between the primary post and the lift sleeve for the base articulation. 

After that portion of the frame was welded the upper structure was built. First I mounted the Gas Saver to a platform which would be removable if I wanted to use it in another location from time to time.  I welded the two arms of the fixed bracket to the Gas Saver adjustment socket and clamped it to the lift rod sleeve about 3” above the floor and checked the movement of the Gas Saver shutoff rod to figure out the best height before welding.  Finally, the torch holding frame was added and clamped while testing the whole operation.  When everything was working perfectly, the welds were completed.

It has been in operation for several days and I added a couple of hangers to hang some accessories like the tip cleaners, and piezoelectric lighter.  It is a considerable improvement compared to my old setup so the time was well spent. 


One little detail which I really like is the hose guard around the foot pedal.  On my old model the torch hose would get underneath the pedal and prevent shutoff or lay on top and prevent it from turning on fully when I piked up the torch.  This wicket arrangement works well.

Wednesday, January 16, 2013

Acorn Table Overhead Frame


When I was contacted by a designer about building some large doors I knew they would be really heavy and awkward to maneuver on the platen table so I decided to build an overhead frame with an electric hoist to make that easier.

Construction began with placing the four corner posts of 2” square tube into the corner holes of the platen table and connecting them at the top with a rectangular frame.  On the east side a short bar, approximately three foot long was attached to the wall from the midpoint of the top long rail for added stability.

Then it was just a matter of making a track for the hoist to travel along from end to end.  A carriage was built incorporating two pulley wheels supported by a piece of schedule 80 pipe stiffened by welding a longitudinal rib of 1/4” x 2” flat bar.  A second pipe was placed above the pulleys as an additional guide.  This was mounted to the top frame as high as the ceiling would allow.

To aid positioning of the hoist I added a wire rope pulley arrangement to each end of the hoist and to each end of the frame top.

In actual practice this is sort a good news/bad news story.  The good news is it works well.  The bad news is I probably haven’t used it enough to justify building it.  Mostly it has been used as the starting point for building other much smaller framers to aid construction of various projects and it has been handy for hanging things and keeping the clamp assortment organized.  More often it operated in “clutter mode” piled with work in progress.

Selected Dimensions:

End opening between posts = 4’4”
Side opening between posts = 9’4”
Table surface to top frame = 6’2”


Sunday, January 13, 2013

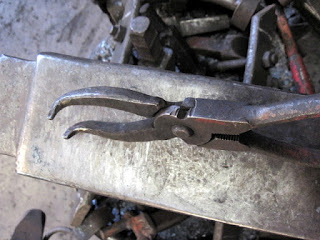
Fence Pliers to Bow Pliers


While making some pot rack hooks I became aware of how handy the pliers I was using were for the job and how often I had used them over the 15 or so years since I made them.

They began their life as one of the several styles of fence pliers and I picked a couple of them up in a flea market for a few bucks.  I recalled someone telling me I should look for them and reforge the jaws into some more suitable shape for blacksmithing use.

The first step was to remove the rivet.  Then, each jaw could be independently heated and forged to the desired shape.  I made one pair with straight jaws and one with the tips angled about 90º.  I don’t recall if they needed oil quench heat treatment but I did quite a bit of that back in those days.


The most desirable features are the very strong jaw with no wiggle and the comfortable grip so they make a powerful precision tool.

Wednesday, January 9, 2013

The Coal Forge Door


There is no damper in my coal forge, it would be possible for a lot of cold air to come down the flue and enter the shop on these cold winter nights.  A solid door keeps that from happening.  It is an important detail which I didn’t illustrate in my previous posts about the forge construction last May.

The door panel itself is the drop from the water jet cutout for the door opening.  The material lost in the kerf is just enough to make the door fit easily.  It is 7 gauge HRS.  I added some side strips in the front to serve as stops.  A hole was drilled in the center of the arch canopy so I could drop a tapered keeper pin which matched up with a 1/2” pipe barrel welded to the door front.  The keeper is attached to the door by a small chain about two feet long.  That keeps me from losing it.

I still had a little trouble getting the door centered when putting it back in place so I welded two bottom guides which are easy to feel and provide an only-one-way fit.  

It works perfectly now but there may be better ways to accomplish the same thing.  For one thing, the door panel of 7 gauge weighs a lot and a thinner gauge would work as well.  Also, a damper mechanism might be a more convenient solution.


Wednesday, January 2, 2013

Bealer’s Bellows Hinge Drawings


Today I thought it might be helpful to post my interpretation of a couple of Alex Bealer’s drawings depicting some of the leather hinging.

The most interesting detail, to me, was how a blocking board was used instead of a leather restraint tether to limit the flapper valve opening.

I thought the Iron Angel blog was a good reference explaining bellows operation and how to make a light weight bellows for using in demonstrations.
The pictures are here:


Tuesday, January 1, 2013

Making a Great Double Lung Blacksmith Bellows


The large blacksmith bellows is found with a number of variations which is as expected with a tool developed over a rather long time period by many craftsmen over a wide geographical area.

The dual chamber configuration, which is my subject here, helps top provide a continuous air stream through the tuyere into the fire pot.  The chambers can be in tandem as illustrated in this Viking style setup. http://warehamforgeblog.blogspot.com/2008/07/aristotle-furnace-demonstration.html  or, on a larger scale, they can be hooked up to a huge water wheel as at Hopewell Furnace as illustrated on this blog http://www.cr.nps.gov/nr/twhp/wwwlps/lessons/97hopewell/97visual1.htm

In the most commonly seen small shop design the chambers are stacked.  In the bellows which I restored the top and bottom chambers were probably equal sized.  It consisted of a bottom (intake) leaf with two circular holes with interior flapper valves, a center (passthrough) leaf with a single circular hole and flapper valve, a solid top panel and two rib panels plus the tuyere and a little bit of other iron hardware for mounting and lifting.

I have heard of designs with two ribs in the upper chamber which opens wider that the lower chamber but have never seen one.

The leaves are laminated light clear hardwood boards of various widths.  As I recall there is no tongue and groove or spline reinforcing in mine and they rely on a couple of transverse boards to keep the panels flat and sturdy. This is similar to how a Z door would be made without the angled racking board.  Some fancy forging as in large staghorn hinges could dress up at least the top leaf which is the most visible part.

Construction weight might be a consideration when moving or mounting but doesn’t matter much when in operation as the lever arm physics aren’t complicated.  Adjusting the fulcrum and length of the lifting lever for comfortable use should be relatively easy.

These antique tools were made in the days before dimensional lumber standardization so board thickness can also vary a lot from specimen to specimen as can the variety of wood and other features.  The center leaf panel may be thicker than the top and bottom leaves as it must accommodate the half axles which suspend the tool and also capture the bottom half of the proximal end of the tuyere.

I decided to sketch a set of plans as if I were making a new bellows with modern equipment while trying to preserve some traditional appearance.  I’m going to use the approximate measurements from my bellows model to make a set of drawings while realizing that scaling up or down might be useful to fit a particular situation.  Mine is just 4’ long and I’ve seen them up to about 6’ and heard of them even longer.

The first major change I would make would be in the center leaf.  It is the spine of the bellows body and sturdiness can provide longevity.  In addition,  it is not visible.  I’d make the center leaf a laminated construction from three pieces of 1/2” thick plywood.  By dividing the inner board into nose and tail segments at the widest point and separated by a 1/2” (strong) gap an axle space is created for passing a 1/2” round rod all the way across.  This insures integral support and alignment.

Using a composite design would also allow relatively easy cutting out of material in the nose end to fit the tuyere.

The top leaf is the least complicated but most visible one.  I would take some care to make it look traditional with clear pine panels glued up with yellow wood glue.  I’d probably use a biscuit jointer technique which wouldn’t be visible.

In the bottom leaf I would follow the advice of others who have suggested making the air intake area greater that the area the air passes through in the center panel.  It would cut three 5” diameter holes in the bottom while the center would have two 5” holes all fitted with flapper valves.  A tail extension can extend the lever arm for lifting. My bellows doesn’t have that feature.

I have seen some designs in which the leather or leather substitute skin attached as a single piece. I suppose it could be made in one, two, three or four pieces.  I made mine with four independent leathers and I think that would make repair of a malfunctioning valve easier.  Which would be about the only reason to get inside the body after the bellows is completed.  Which reminds me that I would add some screening to the bottom holes to block out the wasps and I’d plug the tuyere when not in use.

A satisfactory leather pattern can be drawn by propping up a couple of leaves to approximate the opening angle and using something like a tacked up strip of freezer paper and a pencil to trace the outline of the space. This low tech approach may reflect my Ozark upbringing.  Neatsfoot oil helps keep the leather soft and flexible.  I got out my copy of Alex Bealer’s book and read the section in chapter 3 about the bellows construction and operation.  He states that a good bellows has enough leather to allowing opening to a width which equals or is greater than the widest part of the bellows. Mine will open well in excess of his formula so my leather panels are probably larger than necessary.

After one experience with a minor blow back explosion in the bellows I fitted mine with a ping pong ball valve to prevent volatile gas back flow.  Usually this wasn’t a problem but on a particularly gusty day at a demonstration the wind occasionally dammed up in the forge hood cavity and pushed the gas in the fire pot back into the tuyere and caused a low pitch explosion.  It was easy to imagine how that could damage the bellows skin.

The flapper valves need to be light weight with a really flexible hinge and seal fairly well.  The potential for a slapping noise on closure is a consideration as well as preventing a valve from getting stuck open.  Adding some fabric to prevent wood on wood noise will work.  I used thin soft leather for my hinge material and attached another narrow strip to the non-hinged side to limit the opening arc to about 45º so the valve could never flip over and get stuck open.

The tuyere can be fabricated from 14 gauge steel sheet and the nose collar can be made from something like 1.8” x 2” flat bar or even a strip of sheet.

The nose block is built around the nose of the center leaf.  After it is laminated it is carved to relieve the outer edges and fit the collar which keeps the wood snug around the tuyere.  Today I’d probably spend less time on accurate carving and just hog out the space and the secure a perfect inside fit of the tuyere with GREAT STUFF or something similar where it wouldn’t be seen but would provide a tight air seal.  http://greatstuff.dow.com/products/

Several years ago I made top and bottom leaves but never got any further. Maybe I should take them to a blacksmithing meeting as see if I come across someone interested in going on with the project.

http://www.persimmonforge.com/