Showing posts with label Little Giant. Show all posts

Monday, February 27, 2012

Selling My Little Giant


I believe I’m getting pretty good at making power hammers, at least, good enough for my needs. So, with some reluctance I moved out my trusty 50 pound Little Giant and replaced it my shop built 75 pounder with a smaller foot print.


After some delay, I advertised the machine and soon had a couple of interested buyers.


When the deal went through I experienced some unexpected feelings of “sellers regret” which brought back memories of a deal I made in 1979 to buy a riding mower. Some of the details have slipped my mind but the story goes something like this. Circumstances forced a neighbor to move to another state and it wasn’t feasable for him to move his relatively new riding mower with him. I was in the process of moving to a larger property which could actually justify a riiding mower but I was also short of cash.


The owner approached me about the proposed sale. He offered to sell it for about 40% off the new price

and I knew it was nearly new and he was compulsive about it’s manintenance. It was like his mechanical pet. I told him I thought he could run an ad and get a better sale. He said he didn’t want to do that because he wanted me to have it because he wanted it to go to a good home which didn’t make much sense to me.


Largely due to his persistance, I signed a note giving him one third down, a third in six months and the final payment six months after that - no interest.


Well, I used the mower for years, mowing 2 acres of rough pasture in the process of creating a lawn so I can’t say it had an especially easy career, but overall I think I gave it a good home.


Now comes the Little Giant sale and I am surprised to experience feelings about wantng my pet to go to a good home. I didn’t ask to get back all I paid for it, the extra parts and the features I added. I served me well for years. That’s worth a lot.


The sale went fine and I think it will have a good new home in Indianna.


Thursday, December 8, 2011

Buying My Little Giant


I recently put my 50 pound Little Giant up for sale and when visiting with a prospective buyer I recalled something which struck me funny and I have retold the story a lot of times.


I was in Grapevine, Texas June 1-3, 2001 attending the IronFest Blacksmithing Regional Conference when I saw a 50 pound Little Giant chained on a vendor’s trailer. I had never used one but was interested and I lingered for some time studying it and trying to determine it’s condition. I was startled by a fellow who came up behind me and put his hand on my shoulder and said, “That the one you want.” “Really”, I said, “why?” He replied, “Because it will kill you instantly - no suffering.”


Well, that wasn’t exactly the encouragement and advice I was looking for. Eventually, I met Mike George from Alva, Oklahoma who owned the machine and was offering it for sale. I explained that I didn’t know much about them and he explained he didn’t know much about that particular one because he hadn’t done any rebuilding but had just confirmed the motor would run it.


After a while we worked out an arrangement in which neither of us had much to lose. I’d pay him when he delivered it and If I tried it and wasn’t satisfied he’d take it back and pick it up and repay me. Everything worked fine and that was the beginning of a nice friendship and ten year of enjoyment using my Little Giant before I started making my own power hammers.


It was also a very enjoyable conference, a bit hot, but Frank Turley, Mike Boone, Wendel Broussard and Jeff Mohr gave nice demonstrations and I learned quite a bit and was lucky to buy the Boone-Broussard collaborative grille at the fund-raising auction. It’s a really nicely executed piece and I’ve enjoyed having it on the wall in our entry hall where I see it every day.


http://www.persimmonforge.com/

Thursday, December 1, 2011

My Little Giant Platform


I recently advertised my Little Giant in the BAM newsletter.


For sale: 50- LB Little Giant Power Hammer Number K-7062. I added a fused Square D disconnect switch, new power cord and plug, a pitman wrench, wood base, belt guard, oil reservoir caps, a step to aid top oiling, a dual tang die carriage, flywheel brake and swing-away spring guard. I oiled it daily with Stihl chainsaw bar oil. Also have spare parts worth several hundred dollars. $3500. Contact Persimmon Forge, David or Betty Edwards, 3008 Hacienda Ct., Emporia, Kansas 66801, (620) 343-1947, djedwards@cableone.net.


Soon an email arrived inquiring about how the wood base was constructed and I offered the following information in reply.


“When I brought home my first power hammer (the advertised one) I didn’t know much more than I needed one to make money because I wasn’t going to be able to crank out enough work with a three pound hammer on a Peter Wright anvil. I signed up for Harlan "Sid" Suedmeier’s Little Giant rebuilding course in Nebraska City and learned a lot (all about the 25 pound type).


I can’t recall who gave me the advice about how to mount my hammer so I can’t credit them. I had read about needing a foot or two of concrete footing under the hammer and was prepared to do that if I had to do it but I decided to try the recommended “poor man’s compromise.” I had access to some 3/4” plywood and cut three pieces and slabbed them together with glue and bolted them to my 6” thick shop floor with four corner anchor bolts.


I used the hammer about two hours a day for perhaps 10 years and the floor never cracked. Currently, neither of my power hammers have any wood cushioning so I’m running a greater risk now.


Since the wood underlayment raised the treadle over 2 inches, I had to make a couple of toe brackets to attach to the treadle so I didn’t have to lift my toe so high.


I’m glad I didn’t bust up my floor and put in that massive footing and just used the plywood instead.”


Ultimately, each user must decide for themselves how to deal with the mounting. I’m sure the wood cushioning robbed my hammer of some of it’s potential striking power but on the other hand it worked well for me and the floor never cracked.


http://www.persimmonforge.com/

Wednesday, May 18, 2011

The Dies:


Some time in the obscure past I acquired some odd 50 pound dies and used them to make top and bottom flat dies on "U" brackets. I figured I would fit other quick-fit custom dies over them with saddle mounts. This has worked fine so far. If I had a long run of some particular thing I would probably remove the bolted flat dies and replace them with other custom bolted dies.

The images show what I cobbled together. The bottom die is a KDS lower base turned upside down.

Tuesday, March 22, 2011

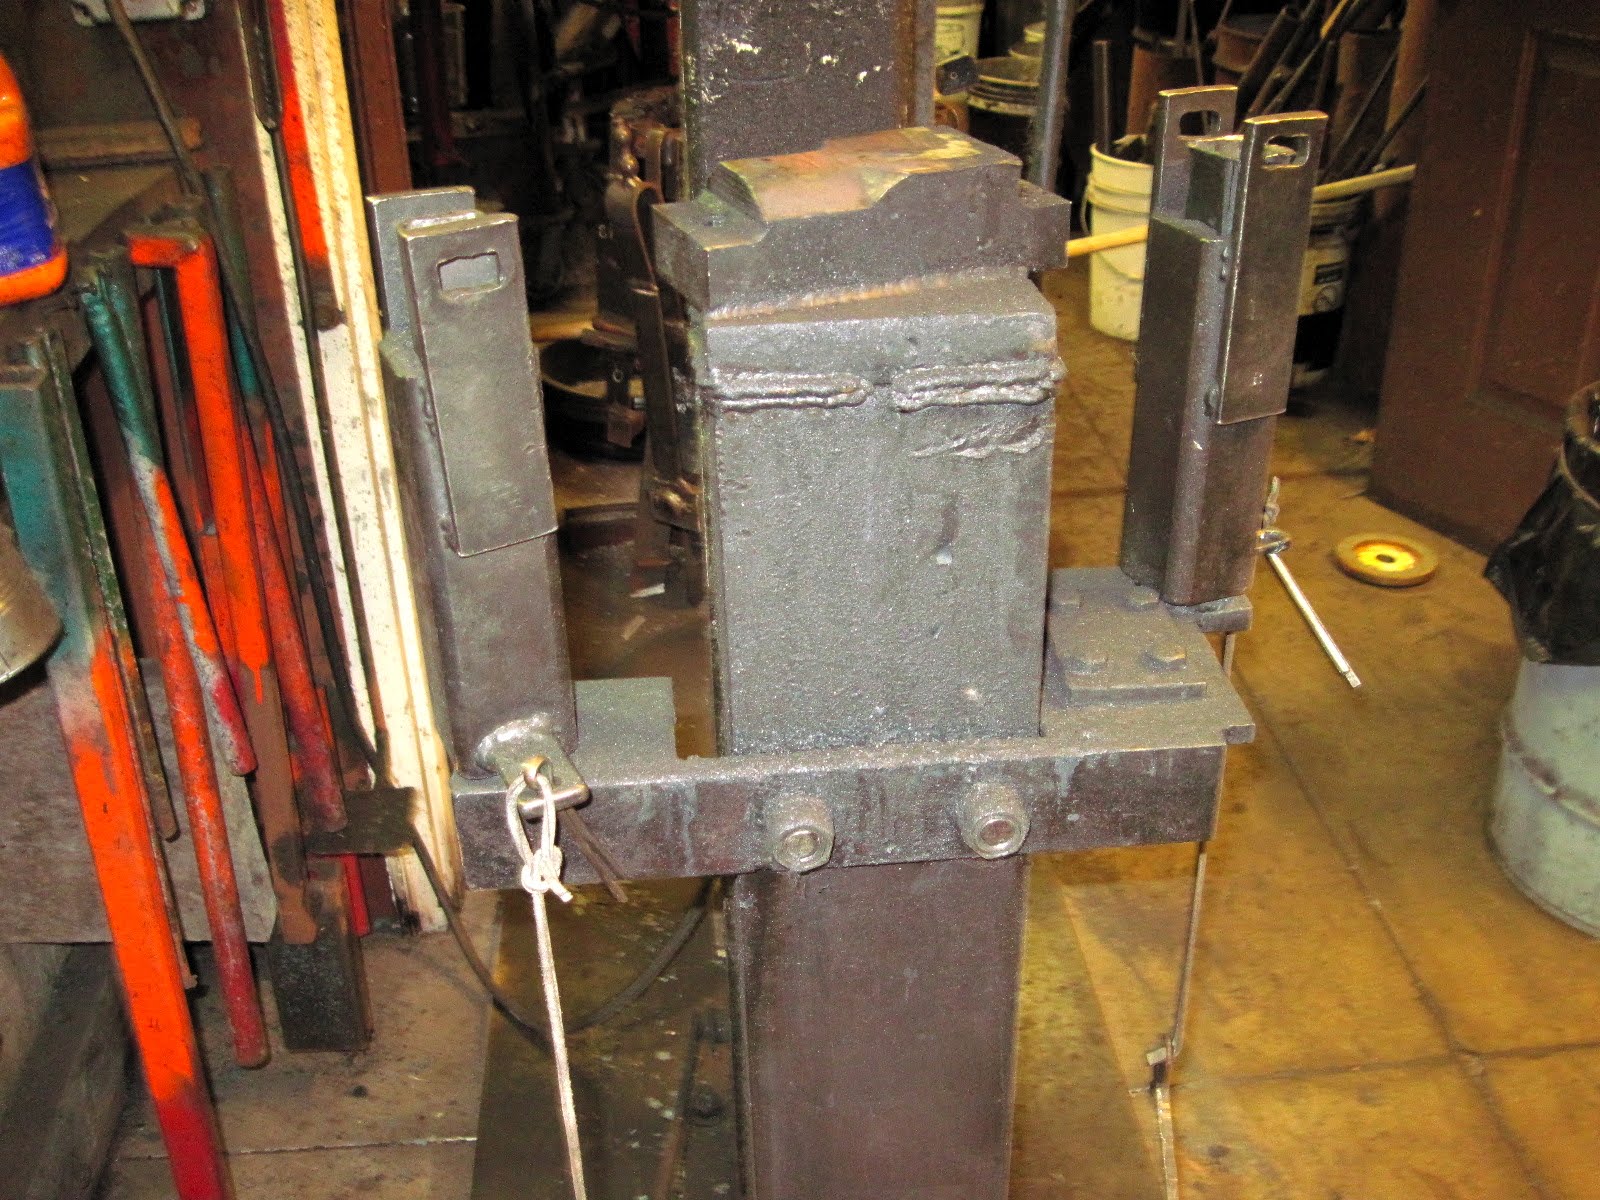
Dual Tang Die Carriage


My first power hammer was a 50 pound Little Giant. I took the rebuilding course offered by Harlan "Sid" Suedmeier in Nebraska City, Nebraska. Check out http://www.littlegianthammer.com/.

I added the usual modifications, spring guard, flywheel brake and a die carriage. Originally the die carriage was a single socket off to one one side of the combination die that would accept a 1" square tang. A variety of dies were made which fitted into that retainer, flat texturing dies, stops of thickness from about 14 gauge up to 1.5", and spring dies. It was the spring dies which gave me the most trouble with wobbling and loosening and loss of control and led to adding a second tang socket on the other side of the power hammer die.

I was very impressed with the increased stability and eventually modified all my dies to the new platform. Later I learned to make my own power hammers based on the Ray Clontz style 50 pound spare tire hammer (STPH) idea. The first one followed the set of plans rather closely in most aspects but after some experience with it I built a couple more hammers with wider throats and 75 pound hammer heads.

On the newer hammers I constructed quick release dual tang die retainers. Refer to the diagram and images above. The basic concept is to hold the die in place with just the weight of the square tube sleeves surrounding the post sockets which receive the die tangs. The die is dropped in place and each sleeve is lifted and a forged "T" shaped key slides in over the die and locked with a large cotter pin which is tethered to the key. To change dies I pull the cotter pins and place them in drill holes in the base tabs and slip out the key and just drop it. The tether prevents the keys from getting separated from the system.

This mechanical system restrains the dies rather tightly in front-to-back and side-to-side directions but permits some up and down movement which doesn't seem detrimental and may actually protect the die. In my situation I found that the stop dies don't require dual tangs but all others are designed for two tangs.

I made a jig to hold the tangs in place while welding so I know they will fit the sockets well. Also the tangs which are made from 1" 14 gauge square tube scrap pieces about 1" to 1.5" in length are "tapered" by collapsing the sides on the leading edge of the tang with the cross peen of a forging hammer.

Stamping each die with some alpha-numeric label is one more detail which aids record keeping. Naturally the stops are stamped with their thickness. Others are stamped with something like BT6 for the #6 bottom texture die. My project notes will record exactly which die was used.

Thursday, July 29, 2010

Working Fast


Getting client work out the door and billed quickly is the engine of cash flow.

I came to the conclusion early on that with the type of things I was doing I couldn’t get along without a power hammer if I wanted to make money. I didn’t know much about them but took a leaf of faith and bought a 50 pound late model Little Giant from a friend. I then went to Sid Sudemier’s class in Nebraska City to learn how to rebuild them.

It has served me well and I have have done a couple of rebuilds and made various modifications and still use it every day. However, if I were starting out today I would build a spare tire power hammer (STPH).

At the 2008 BAM conference I bought a set of plans from Clay Spencer (designed by Ray Clontz) then went home and built mine with a few variations. It works very well and has a number of advantages over my 50 pound LG. It hits straight down not with the slightly glancing blow delivered by my LG. But probably more importantly I can fix everything myself quickly as nearly all the parts can be found locally.

Another aspect of working efficiently revolves around the most efficient way to heat what I’m working with. I found there were distinct advantages to making both a coal forge and a gas forge. I use the coal forge for working stock with large mass and stock that requires higher heat or is too awkward for the gas forge.

I use the gas forge when I need to work many small pieces simultaneously. I make a lot of small leaves and other plant parts to use in botanical sculptures. These are laser-cut blanks of usually 12 gauge 1011 steel. I can put 10 or twenty into my gas forge at a time and don’t fear losing any to oxidation.

After using a rectangular gas forge for several years and being frustrated by it’s fixed 6” square inlet I decided to make one of loose firebrick so I could shape the chamber to suit what I’m working with. It’s a bit slower to heat up because it doesn’t have the reflective refractory lining but I think the flexibility offsets that disadvantage. I still have the old forge to use if it seems a better choice. My propane tanks and forges are equipped with quick-connects so switching is easy.

Another part of working quickly is avoiding as much effort as possible in removing fire scale and that is where my tumbler comes in, and that’s a future story.

Monday, November 2, 2009

Forge Room


Continuing a welcoming introduction I’ll present an overview of my workspace starting with the forge room.

The building is approximately 40’x40’ and located about 100 feet from my home - real handy! Located on the north edge of town just a few hundred feet from the Neosho River and just a bit higher than it’s flood plain. To the east, south and west is residential property.

The studio has three first floor rooms and a porch. There is a loft area upstairs. Each space is organized into several dedicated “work stations.”

The forge room is the northwest quarter of the space. When I can’t have the whole studio open due to summer heat or winter cold I can close the doors to the forge
area and leave the heat or AC working in the rest of the studio.

In the NW corner of the forge room is a stationary coal forge with a 3’x3’ apron around the firepot. An electric Champion blower is attached to one side (the motor is
outdoors on the porch so I don’t have to hear that noise) and a Champion hand crank blower on the other side. I can flip a switch and run the big blower and close a blast gate on the hand crank side or slide open the blast gate and turn a hand wheel valve and shut off the electric blower side. I feel this gives me the best of both worlds -
the hands-off advantage of electricity or the hands-onfine control of the hand crank.

Beside the coal forge is my four-burner, loose brick gas forge hooked to a 100 pound propane tank outdoors on the porch by a quick connect coupler. It is on wheels and I can choose between using one, two or four burners. Above it is a large hood and exhaust fan. A two-burner forge and a three-burner, both portable with 20 pound tanks are on the north porch along with the coal supply.

In the NE corner is a 50 lb late model Little Giant power hammer. On the east wall is a work bench. I hang the power hammer dies on a pegboard above it. A carbon monoxide monitor is plugged in there.

To the left of the power hammer is a stationary 40 gallon quench tub, a cone anvil, a large swage block on a low stand both of which get moved front and center only when I need them.

To the right of the workbench is a small swage block on a tall stand. On the wall above this is a large paper pad, charcoal & chalk holders and slate chalk board.
This is where I sketch conceptual drawings as I work.

In the SE corner is a fire extinguisher small rolling work table and the flypress. On the wall is my “sketches in iron” display where I store small test pieces - a library
of “visual solutions.”

On the south wall is a shop built Hossfeld-type bender, a 6” pedestal grinder, a Smithing-Magician, and a tall industrial fan.

In the SW corner is my inline treadle hammer and alphanumeric stamps and touchmarks and other associated tools.

On the west wall next to the coal forge is a 4’ work table made from 15” channel mounted on a scraped lathe base.

In the center of the room is a 5” post vise on a large stump, a 4” post vise on a 14” stump, a 120 lb Peter Wright anvil mounted on a concrete-filled beer keg and a 250 lb
Trenton anvil mounted on a large stump.

The next installment is the Layout Room.