Saturday, November 30, 2013

Creased Hot Collars


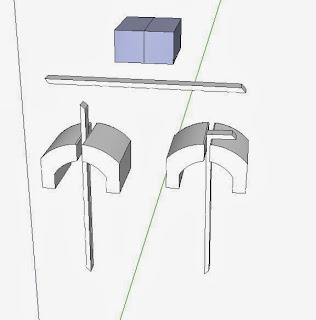
This illustrates another version of forming hot collars.  If the project calls for a number of nearly identical collars, test collars can be made and when the precise measurements are known, a “witness” collar can be formed.

From that template, many copies can be made.  To facilitate identical bending the bend points are creased with a fuller die.  This can be done by hand with hammer on anvil, treadle hammer, fly press, etc.  Presumably, a jig could be set up to make the process even more precise.

Metal bends where it is thinnest or hottest.  This is an example of exploiting both tendencies through selective torch heating at the crease.


I first saw an example of these collars lying on a platen table at Flicker Forge alongside the die which made the crease.

Fuller creases at bend points.

Friday, November 29, 2013

Forging Hot Collars


I did a web search for the Francis Whitaker hot collar formula.  It is illustrated in his “Blacksmith’s Cookbook” and I’me heard many people recite it.  It wasn’t so easy to find on the web so I decided to do some SketchUp illustrations and post them the the 3D Warehouse.  When I tried this morning I got the message that “The service is not available.  Try again later.”  So, I plan to do that.

In the meantime I’ll post images of some illustrations I drew.  The show the Whitaker formula and the sequence of steps in the forming process.
Bill Fugate published the formula in the Pittsburgh Area Artist-Blacksmith Association newsletter in July 2010.

Carl Davidson published a nice article in the Northeast Blacksmith’s Association Spring 2012 newsletter showing how to modify and Engineer’s wrench into a neat adjustable collar making tool.  I couldn’t find a link to it just now.


Next time I’ll illustrate another way to make collars which I learned on a visit to Flicker Forge.

The Francis Whitaker Collar Formula 
Starting the collar forming after calculating the collar length and beveling the ends.  Francis suggested finding the CL then moving over one half the width of the waterfall to be collared to start the first bend.  This should get the lap pretty well centered.

A mockup of the workpiece can serve as a mandrel to be used with the vise. 
The collar can be finished on the mandrel and opened to fit or the final two bends closed over on the workpiece.

Sometimes is most efficient to form a batch of collars on a mandrel and open them up so they can later be fitted and closed on the workpiece with torch heat.

Thursday, November 28, 2013

Wired Bolts


Yesterday, another bolt loosened on my spare tire power hammer.  The bolt serves as a retaining pin and it’s threads have fretted away.  There are two set of pins so it has never gone far enough to develop into a real safety problem, but it is a nuisance.  

A few months ago this happened on one bolt in the front pair so I removed them and welded on small square nuts, replaced them with the usual coating of black silicone caulk and passed a wire through the nut holes and loosely tightened it.  The bolts have stayed in place since then.


It was one of the back pair that jumped out yesterday so I did the same thing, welded the nuts and passed the wire.  I haven't had time to take another image with Thanksgiving preparations and the image I took of the first fix is a poor one.  Still, I think, this is enough to get the idea across.


Wednesday, November 27, 2013

Stop Stock


In my shop, a “stop” tool has at least two contexts.  Is it a length stop, or a depth stop?  The term “depth stop” almost always applies to my power hammers.  The term “length stop” applies in a lot of other situations.

What I actually had in mind was a specific tool I was making which incorporated an adjustable length stop.  Sometimes it’s desirable to make a length stop mechanism which can rotate and sometimes, not so.  In this case it was, not so.

Often, I make length stops with 1/4” round in 1/4” tube.  It is snug and rotates smoothly.  If I want a “non-rotating” stop, I use 1/2” square tube as the guide and 3/8” square solid as the shaft.  OK, 3/8” square bar won’t fit into the 1/2’ square tube.  To quote the GEICO commercials, “everyone knows that.” 

My solution in is to use a depth stop to make a length stop.  I heat 3/8” square in the coal fire and draw it through the power hammer with a 3/8” “weak” depth stop in place.  That particular stop is a dedicated tool which delivers the exact result I need for this.  The fit is snug.


Stop stock, peculiar title?   I thought, “What could it mean?”  Then, in my mind, I heard the tune, “to a day dream believer, and a homecoming queen.”


Tuesday, November 26, 2013

What could possibly go wrong?


Possibly this question paints the distance between the novice and the experienced as well as anything.  Novices believe things will proceed as they imagine while the experienced know a lot of the potential hidden bummers.  Perhaps, they are not infinite but their number is robust.

I believe in Murphy’s Law.  I think the safest position is to remain skeptical and apprehensive all the way through a project.  I have found that I can cope with problems which emerge in my shop much easier than I can manage a problem on a job site.  My solution was to eliminate job sites.

As I thought back over a few years I could recall quite a few ways plans can go wrong.

My MIG welder doesn’t work. Begin trouble shooting.  Is it a GFI or circuit breaker box problem?  Is it a bad outlet problem?  Is it and internal welder problem?

I forgot some tools.  Somebody changed something and I didn’t know about it.  Rain, heat, wind, ice, whatever, came unexpectedly.  I didn’t hear that.  I didn’t remember that.  The client changed the design.  The client changed the schedule.  Some illness/injury appears.  Helper is not available - there are a multitude of reasons.  A conflict develops in my schedule, again, there are a multitude of reasons.  The extension ladder wasn’t tied in the truck bed and blew out somewhere on the interstate.  The concrete is much harder than I’ve ever encountered.  The bolt breaks.  The generator won’t start.  We can’t drive to the site anymore.  Deep mud surrounds the worksite. Deep mud extends from where the trailer is parked all the way to the pavement.  A truck tire blew out.  The road was closed.  There was a power outage. The part is backordered. The motor burned out.  They went out of business. It took a lot longer than I thought.

“The best-laid plans of mice and men / Often go awry.”  A word to the wise from Robert Burns.


Monday, November 25, 2013

A Lily Pad or a Lotus Pad?


This a topic which is important to me.  When I started my iron art business I decided to focus on botanical objects.  My formal educational background was not strong in that area and I knew a lot more about zoological subjects.  One of my Grandfathers had a small tree farm and, as a teenager, I helped him plant seedlings which he later donated to newly developing treeless neighborhoods.  Eventually, I developed a strong interest in gardening and landscaping.  Botany was a subject of personal investigation and my knowledge is still spotty but I strive to be reasonably accurate in how I portray the species I render in my ironwork.

First, I pick a specific plant because there is a lot of variation from one variety to another.  I usually pick plants which grow locally or are commonly seen in nearby botanical gardens.  

When I started making water plant sculptures I made a version of cattail first.  It seemed the simplest and was a popular sculptural element.  Later I added horsetail, bamboo, arrow arum, pickerelweed, and lily pads.  When I started making the pads I noticed that some images showed a circular leaf with a radial notch and some were fully round.  As I did the investigation I found I and others confused two different groups of water plants - thinking they were one.

In botanical water gardens we often see examples of both.  Initially I lumped them together as close relatives.  They are not.  Nymphaeaceae is a family of flowering plants commonly called water lilies and live as rhizomatous aquatic herbs in temperate and tropical climates. I make one version of that group.

Nelumbonaceae is a different family of flowering plants with only two species.  I decided I would make both the American Yellow Lotus, Nelumbo lutea, and the sacred lotus, Nelumbo nucifera.

The American yellow lotus has the round leaf with the radial notch and the sacred lotus has the fully round leaf.  My version of the water lily also has a pad with a radial notch.  There are other differences in the a

natomy and morphology of the plants also which may be important depending upon how closely the sculpture needs to represent the plant.

This is a link which gives a pictoral explanation of some differences.

Sunday, November 24, 2013

Thread Lockers


I always keep some black silicone caulk on hand and use it on various projects.  It is strongly adhesive to most of the materials I use and it peels off easily and cleanly when it must be removed.  I first started using it to hold the glass panels of fireplace doors in place and later started using it as a general shop adhesive in many ways.  The only brand  have used is the DAP 08642 Black silicone sealant.  http://www.dap.com/product_details.aspx?product_id=25  There are probably other brands which would work as well.
The black silicone caulk has worked better than anything else I have tried to keep the screws in place on the STPH hammer under the extreme vibration conditions.  I could have used the Loctite Threadlocker Blue 242

For a time, I used Goop  http://www.amazon.com/Amazing-All-Purpose-Household-3-7-Ounce-130012/dp/B0000A605I  as the first choice adhesive in the shop but the contents of the tubes seem to dry out and become unusable more quickly that the silicone.  Using the caulking gun is a bit more tricky than squeezing a tube but I’m well up the learning curve on the technique now.  I cut the tip so it will seal tightly with a 60d smooth box nail, apply the caulk and reinsert the nail about half the shaft length and let off the pressure.  That leaves it easy to remove and keeps the silicone remaining in the tube from drying.

Someone suggested I try Lexel which is supposed to be more flexible.  I don’t have much experience with it yet but I’v used it to repair some small holes in the cowhide welding gloves and it seems to work satisfactorily. 

http://www.sashco.com/hi/lexel.html
I haven’t yet tried using the Permatex General Purpose Thread Sealant which I use with hydraulic fittings.  It is light gray in color and would probably work something like the silicone. 

http://www.all-spec.com/products80633.htmlgclid=CKWZpfD5p7kCFWJp7AodWW0AAA


Saturday, November 23, 2013

Loose MIG Nozzle Fix?


My MIG gun fittings became so worn it was easy for the nozzles to fall off or pull off.  It was very unhandy.  So, last August I wrapped the gun fit area with teflon tape to make the nozzle fit snugly onto the diffuser. I made sure that the tape did not clog any of the gas outlet ports.

This has worked well for three months so far.  Maybe eventually it would be better to replace the O ring.

The tape wrap is looking pretty tacky now but the nozzle hasn’t fallen off once.


Initial appearance of the teflon tape.

Current appearance at three months.

Friday, November 22, 2013

The Kirk Sullens Persimmon


When I was looking for the images of Ned and Esther Digh at the BAM demonstration I also found a couple of images of Kirk Sullens.  I had met him before at some BAM meetings but had never really spent time with him or seen him work.

We were both helping out at the Missouri State Fair BAM tent and he saw my persimmon logo and enquired about it.  I explained why I had picked it as an emblem for my  business and developed my logo.  In the conversation I used the word calyx and he reacted with a questioning expression.  I asked if I had used the wrong term and he said, “No, I’m just surprised you knew it?”  We shared a laugh and he asked it I wanted to work with him and he would do a chasing and repoussé version of the logo.

We didn’t really have a set of chasing tools but we found a piece of sheet metal and did some improvising and had an enjoyable time working on the project.  It was my introduction to the technique and I learned a lot that day.

On a later occasion I visited the Bass Pro Fabrication shop in Nixa, Missouri, where he was working at the time and hosted a BAM meeting.  That was the last time I had an opportunity to see him work.  He made a very nice forged octopus.

Kirk does magnificent work and is currently living in Florida.  I treasure my memento of that day at the fair.  It is mounted on my stairway wall.

Kirk sketching the logo.

Kirk chasing the logo.

The finished logo.

The persimmon on my wall today.


Thursday, November 21, 2013

More Nice Gifts


We were fortunate recently to be visited by Ned and Esther Digh for an afternoon.  They were on their way home after a family visit. It was a great afternoon.  Beautiful fall color.  Betty baked a pie.  They related tales of their most recent visit to Alaska.

We’ve known each other for more than 15 years having met at a BAM meeting.  They have been very active in BAM and instrumental in it’s continued success.  They both have multiple craft talents and I am the beneficiary of several of their gifts.  On the recent visit Ned brought us two pens he had turned from Missouri spalted oak.  On the door of my writing room hangs an anvil tapestry which Esther made and on the east door of the shop is a cast sign which Ned made.

Their travels used to take them back an forth across Kansas pulling their Airstream so we could offer them a place to hook up but they no longer have a Colorado connection so they don’t cross our path.  We usually meet at BAM meetings.  Unfortunately the distance involved makes my attendance infrequent, often just a couple of times a year.  Our next visit will likely be at the annual BAM conference at the state fairs grounds site in Sedalia in early May.  The meeting following that will be at Ned’s shop in Ham’s Prairie near Fulton.


A Google search will turn up a lot of links to Ned and Esther.  They lead an active life.


Demonstrating at the Missouri State Fair

Heading Home to Ham's Prairie

Wednesday, November 20, 2013

More on Flue Downdraft


When Ken came to help me Monday afternoon I told him about my experience with the downdraft in the high wind.  When we started discussing a Venturi effect solution he said he recalled seeing some devices for chimneys whig worked like that.

It was one of those cases where their is a hiatus in my knowledge.  Sure enough, when I looked for information it was right there.  These are two references and there are a lot more.  If I do decide to eventually change the flue cap, I won’t have to reinvent the wheel.


Tuesday, November 19, 2013

My Black Walnut Huller


Every few years we have a big crop of black walnuts.  On a few occasions we have decided to gather a few gallons of them to harvest the nuts.  Other years we just let the squirrels take them.

There was only one year about 30 years ago when I collected half a pickup bed load of them.  We spread them on the driveway and drove the truck over them to crush off the hulls then swept and shoveled them.  It was a messy business and it took a while for the stain to disappear front he drive.

If harvesting walnuts is a serious business there are commercial machines available.  I’ve never  collected enough too make that worthwhile.  After I was set up with ironworking equipment I made a tool which suits my needs.  It costs virtually nothing, is small and indestructible and easy to store.  I came across it when reorganizing the garage a few days ago.

I made it from a couple of pieces of heavy bar stock scrap - 2” x 1/2” and welded a cross assembly.  Then I heated the ends and bent them down to fit over a piece of 8.5” pipe about 18” high.  Finally, I cut a 1 3/8” hole in the center with the torch.

I set it up so I could sit comfortably when using it.  It is about as low tech as it is possible to get.  I place a nut on the hole and tap it with a hammer.  The nut shoots down into the collecting pipe as almost all of the hull strips off. I brush off the hull mess and place another nut.  It goes pretty fast.  The nuts are put in a five gallon bucket and washed with a garden hose the laid out to dry (away from the squirrels).  After a few weeks they are ready for cracking.

The ritual is just one way of staying in touch with early American traditional living.  Cracking walnuts in front of the hearth fire was a form of entertainment before TV and all our other contemporary distractions.  Cracking is another issue entirely and I’ll write about that when I get the time.  

This year we had a scant crop of walnuts, probably related to a late spring hard freeze, so I left them for the squirrels.  As it turned out they would have had plenty to eat anyway as there was an enormous acorn crop.  It was a good year for the hickories and pecans too.  Pawpaws were scarce but persimmons were plentiful.  I can never guess how it will work out.

My pin oaks had the largest crop ever and from my shop I could watch a group of blue jays work the tree for several weeks removing the nuts.  There activity was so apparent that a couple of hawks took up a vigil in nearby trees and I saw them make a couple of unsuccessful attempts to grab a jay.

One bad experience with hulling walnuts stands out in my mind.  After I built my tumbler I tried it with about 50 walnuts.  They were clean in a jiffy but it took weeks for all the hull gunk to leave the tumbler.

.


Monday, November 18, 2013

Flue Downdraft


Kansas has a reputation for being windy.  Yesterday was a prime example.  A strong west wind blew all day, with few moments of calm and hundreds of strong gusts.  It was a good day for cleaning gutters.  Most of the leaves are down now and the wind blew streams of them across the yard.  I hope most of them reached the Neosho River and won’t return later.

Dustin Michelson, photographer for the Emporia Gazette, had made arrangements to visit the studio and take some images for an articlein a future edition of Emporia Living Magazine.  http://emporiaksliving.com

I was going to get the coal forge fired up so I could demonstrate how my hot work is done but as soon as I opened the door at the bottom of the flu a strong gust of ash and soot blew in and covered me in an instant.  I closed the door and washed up before he arrived.

In spite of our reputation for being windy, there probably are only a handful of days in a year when the wind is so strong I can’t get the forge to work because of the downdraft.  Yesterday was one of those disappointments.  We’ll get another opportunity soon.

The downdraft has never been inconvenient enough for me to think much about and fix and I’ve never actually tried anything beyond making a door to fit in the opening of the smoke collector.  I originally made it for use in the winter so that cold outdoor air doesn’t enter at night.

Now, I’m wondering if I can design a fitting which will allow me to make use of the wind to create a Venturi effect and actually suck air up the flu.

The flue is on the west side of the building and the prevailing west wind moves from left to right .

The door has an almost "air tight" fit.  It seats in two pockets at the bottom and is locked by a drop pin from the top.  I did not add those details to the drawing.

Sunday, November 17, 2013

Pipe Fitting Work Support

Last August 29th I wrote about How I’ve made some work stands.  


Work supports seem to share a category with clamps - there are never too many.  This is just another method of making a T-handle lock especially good for anyone who has access to pipe and pipe fittings and needs another adjustable work support.

The pipe tee fitting is the key feature to this design.  It is the locking mechanism which hold the height adjustment and lets the pot pivot.  After I made the drawing I decided it might have been better to use the larger pipe for the segment which threads into the base coupler and let the smaller pipe run up to the bracket.  This would keep the center of mass lower.


Friday, November 15, 2013

A Nice Gift


The Rocky Mountain Smiths hold an annual conference in Carbondale each summer.  I’ve attended a few times.  In 2009 I registered and paid attention to email discussions about the conference preparations.  A post went out asking if anyone could stop at the Denver airport and provide transportation to the conference for one of the demonstrators, L. Japheth Howard from Flicker Forge in Prairie Hill, Missouri.  He was currently working in Canada and would be flying in from there.

I knew our usual route took us just a bit south of the airport so we checked on the timing and found it would work out.  I had met Japh at Flicker Forge in January 2002 when he and his wife, Alice James, hosted a meeting for the Blacksmith’s Association of Missouri.  The shop was impressive with a lot of equipment much larger than I had ever used.  Both Japh and Alice demonstrated and it was a great meeting.  Several inches of wet snow fell the night before so the landscape was beautiful.  The meeting was well attended so I knew Japh would probably not recall seeing me there.  We made the arrangement to meet him at the airport and drove for several more hours to Carbondale.  We visited and he read some back issues of several blacksmithing publications which I had brought along.  He explained the new job he had taken in Canada but was uncertain how long he would continue there.

The conference was very enjoyable.  Japh demonstrated his skill making pieces which required very careful planning and meticulous execution.  Jim Pepperl from Silver City, New Mexico also demonstrated.  He made several pieces of very nice Southwestern style hardware.  I was particularly fascinated by a cane bolt he made with a ball-spring detent.  

One of the conference highlight is the Saturday night silent auction.  I was happy to see that Jim had put in two of his cane bolts. The participants circulated around the tables penciling in their updated bids.  As the closing time neared I noticed that it was mostly Japh and I who were contending for the cane bolts.  When I fully realized that I stopped bidding as I felt he had a big role in making the conference a success and deserved to take home the souvenir.  He won the auction and I remarked that I felt he had bought some really exceptional work and he agreed.

On Sunday we drove back to the airport and as we were unloading his luggage he gave me one of the cane bolts and thanked us for the ride.  I was really pleased by his generosity and wished him a smooth and safe return flight.  We drove on toward home stopping for an overnight rest as it started to get dark.  The prospect of hitting a deer in the dark is not appealing at all to me so we have long made it a practice to avoid night driving when we can.

I met Japh briefly once more a few years later at a BAM conference.  He had continued working at his forge in Canada.  I recently found this reference to the project.  You can find him under :: Curators. 


L. Japheth Howard at RMS Conference 8/09.

Jim Pepperl at RMS Conference 8/09.

Pepperl cane bolts and other hardware.

Thursday, November 14, 2013

Drifting Alone


Just picking the title brought back memories of lazy days floating the Jacks Fork and Current rivers in a canoe.  Those trips often included a visit to the famous Alley Mill. http://www.nps.gov/ozar/historyculture/alley-mill.htm

However what I actually had in mind was describing a jig to assist drifting a hole when there is no one available to assist.  The actual case which prompted the construction of the jig was the need to drift a square 3/8” hole in 3/8” x 3/4” square bar four times. 

I wanted to work at the vise with torch heat so I designed to that setting.  The jig needed to hold the work piece securely, prevent long-axis bending as the local spot was heated, allow the drift to pass all the way through, and allow the swell to develop on the sides. Since the bar is clamped there is essentially no growth in length.  The pieces were long and awkward so I drilled small pilot holes with a 3/16” bit.


This will work but, when I have the luxury of helpers, I prefer to work at the anvil with coal forge heat an have one assistant hold the bar and another position the drift while I use the sledge.

The finished jig.

Drift jig front.

Drift jig back.


Workpiece with pilot hole.
C clamps on workpiece.

Jig clamped in the vise.

Wednesday, November 13, 2013

The Mounted Bolt Cutter

I use 10 gauge black annealed wire in several products.  12, 14 and 16 gauge wire is used mostly as a bundling material.  As a cost saving measure I bought the wire in rather large coils which are heavy and awkward to handle until they have been cut into smaller sections.  The wire arrives new in a pickled and oiled state so I store it outdoors and let Mother Nature remove the oily residue by weathering.


I’m happy with how I have my wire supply set up now so it is really handy to cut a piece quickly and with little effort.  The coils are hung on the wall just outside the door near my primary work station.  I welded a tang on the bolt cutter and mounted it on a swivel at comfortable working height near the wire.  I can just uncoil the length I need and place it in the bolt cutter jaw and cut.

Bolt cutter on swivel mount.

Uncoil and snap.

Tuesday, November 12, 2013

Veteran’s Day


I don’t usually attend Veteran’s Day activities and, yet, I am a veteran.  Emporia, my home now, was the founding city of Veteran’s Day, fifty year ago. http://www.emporiakschamber.org/custom2.asp?pageid=895

I served in the Vietnam era.  My span of active service was 1988 - 1997.  All of my service was in the continental United States.  I was never “in country” in the combat zones.  I witnessed a lot of carnage that resulted from the war but I was never shot at outside of some training exercises.  I had the opportunity to visit with hundreds of wounded soldiers as I cared for their wounds.  It took me over twenty years before I was able to move on and not think about that experience on a nearly daily basis.

I am very favorable to veterans.  I thank them for their service and sacrifice whenever I see an opportunity.  I donate monthly to the Wounded Warriors Program and I am a member of the American Legion, but I have been to our local meeting place only once in the past twenty some years.  I really don’t want to think back on those years.  Sure, I’m glad I served, I hope I provided some healing and comfort, but sometimes if is just better to quit looking back.

My father served three years in WWII.  One of his colleagues was involved in setting up Radio Free Europe.  I have a French “brother” who lost his soldier father just as the war ended.  I have a step-brother who was an officer in Naval Intelligence.

As a child I knew an officer who was on the Bataan Death March, a submariner who was rescued from the USS Squalis, and an G2 agent who played a lot of bridge and probably helped disguise the date of D-Day.  I knew an airman who was shot down on his first bombing mission in a B-24 over Germany and served time in a stalag.  He later wrote a manuscript for a novel, which I read, but he never published it.  I feel that essentially my entire life has been lived in the environment of the United States armed forces.

So where does this memory flight land?  First, I don’t like reliving painful memories.  Second, I appreciate the sacrifice of all veterans who served their country.  All gave some, some gave all.  Thirdly, I don’t count my non-combat service on the same plane as the combat veterans, but I do acknowledge that it was not trivial.

A couple of months ago I was asked to forge a small “Tip of the Spear” emblem for a SOCOM soldier who was retiring.  His fellow servicemen were designing a shadow box retirement gift in which they would place items emblematic of his carer and the spear point would be a featured item. http://www.socom.mil/default.aspx  During my active duty years I became acquainted with a number of special operations soldiers.  These are very brave and dedicated souls.

As a forging project this was not a big one.  The finished piece was just about 4” tall with a traditional black finish.  One requirement was that the back must be flat and suitable for engraving of another message.  I did a little research and found todays insignia is a slight variation from the original OSS insignia.

I cut a blank from 1” solid square mild steel about 4.5 “ long and welded it to a porter bar.  With coal fire heat I forged a short tip taper then draw a flat spear point shape the full length. I made a round taper from 5/8” round tool steel and used it to make a half-round taper swage into which I could drive the blank with a high heat using the hydraulic forging press.  This extruded enough mass on each side of the spear to forge the blades.  I used a forging hammer on the anvil to fuller the flare of the blades which were then trimmed to shape.

I made another swage in which I formed 3/16” round into the half-round hafting bands. With torch heat I wrapped each band and MIG welded it on the back side.


I felt it turned out pretty well and I sent an image to the client by email.  It was approved, I shipped it and got a PayPal payment and that is probably all I will ever know about the project.  I don’t know the name of the retiring SOCOM individual or anything about their biography, but I’m thankful for their service and wish them an enjoyable retirement.
Tip of the spear insignia.

Scaled drawing of spear tip.

Blank after swaging in hydraulic press.

Pattern traced on backside of fullered blades.
Half-round hafting bands added.