
I make a lot of botanical sculptures mostly of sizes which serve as table displays. Invariably the heavy base has some undesirable rough areas which could damage a table top. First, I tried some commercial soft pads with adhesive backs but later moved to making my own pads from cowhide scrap leather.
Our local farm and ranch supply store usually has a selection of packets of leather scrap. I look for ones which have flat pieced - preferably black and also long strips, usually dark brown which are good for suspending forged dinner bells.
I cut circles from the flat scrap and fix three pads to each sculpture using black silicone caulk as the adhesive. I position the pads so they avoid the touchmark areas and make the piece stable.
I I could have found a nice cutter in an antique shop I probably would have picked one up. This site shows a nice collection. http://www.antiqbuyer.com/images/ARCHIVE_PICS/archivetools/Leather/leathercuts/leather_cutters.jpg I think those are designed to be struck with a mallet.
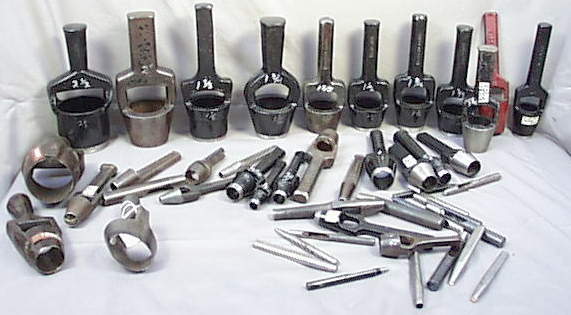
Well, I wasn’t that lucky so I made three versions with similar mechanical design but which cut three different size circles and fit in my fly press. The smallest makes about 1” circles and the largest cuts about 1.5” circles. I used SketchUp to draw a rough version of the largest one.
I start the construction process by cutting a piece of lawnmower blade scrap to make the blades. A strip an inch wide and about 5” long will make the large size cutter. I forge a circle over a round mandrel and MIG weld the seam and clean up the inside of the blade so it is smooth and won’t have burrs which tend to grab the leather drops and keep them from ejecting.
The blade edge is made by ordinary grinding, sanding and polishing. I make a cutout in one side of the blade to allow the ejecting lever room to travel and it might be a good idea to cut another knockout access window in case a real jam occurs.
I make a barrel and axle mechanism with some small pipe and round rod. The ejection lever tip is heated and bent and polished so the angle is optimal for pushing out the cut pads.
The top structure begins with the 1” x 1.5” bolt which I use as my standard ram tang. I’ll grind away the threads at the tangent where I want the locking bolt to seat after I know exactly where that will work best.
The shank is cobbled together so it is appropriately long and strong. In this case I used a large punch drop and a short piece of 1” round and MIG welded it all together. I usually just “tack and test” before I do the final welding.
The final piece is the bottom tool which will stop the blade travel. I tried several materials and settled on a block of very high density polyethylene. I wanted it to stay in register with the blade so I used the black silicone again to glue on a 7/8” nut which exactly fits the fly press base tang hole. The poly block is rigid enough to back up the leather so a clean cut can be made in three easy bumps and prevents damage to the blade edge. The more the system is used the better it all works. Some lubrication inside the blade may help too.
The depth is sufficient to cut three pads before ejecting but it is a little harder and probably doesn’t save time. I should note that the images show the large cutter with the original 60d nail lever. I later changed that to 3/8” round rod about 6” long.
There are a lot of blacksmiths around demonstrating how to draw a taper or forge and upset square corner so I tend to concentrate on sharing the odd-ball things that are part of my blacksmithing business. These leather pads are a little detail that can keep clients happy.
I posted the drawing on 3D Warehouse.
I posted the drawing on 3D Warehouse.


http://eprice.co.in/chrome-tool-plastic-grip-guillotine-paper-cutter-from-flipkart/ may also be helpful here.
ReplyDelete