There is not much better than having a good friend unless it is having a good friend who is smarter than you are. Jim Friel is one of those friends. He has retired from a long career in blacksmithing and fabricating but maintains an active interest and attends some conferences. He lives in Colorado and I live in Kansas. We both usually attend the BAM conference in Missouri the first week end of May which traditionally features winter-like weather.
After the conference he sometimes hooks up his motor home at my shop and stays a couple of days to exchange blacksmithing ideas. We enjoy the banter about which of us learns the most. He has far more experience but I work on projects which are quite a bit different than the ones he focused on. At any rate, we have a great fun time and I think both of us benefit from the back and forth.
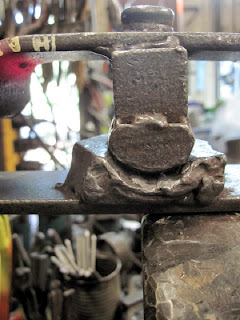
Today I made some modifications to a couple of dies which he made for me on one of his visits and I felt the preliminary results would be worth sharing. Jim observed how I was doing the process of texturing sheet and then cupping the sheet to make hollow form tree branches. Based on his experience he showed me how what I was doing in two steps could be done in one step.
He made a couple of spring dies which could produce the product needed in two sizes. This was a couple of years ago and I am just now getting back to the project, a personal one, which I call “The Persimmon Forge West Wall Sculpture.” I always work with the idea of “killing al least two birds with one stone”. In this case it meant working with the dies Jim made but changing them from the hairpin bend spring die design to a bolted spring die design, a concept I am experimenting with. I also have another client project which will need these dies.
I torch cut the hairpin bend and straightened the arms on the two dies I mounted them on a 2” square tube spacer and made the double bolt fixation modifications. Then I discovered that one had an “overbite” and the other had an “underbite” misalignment. Almost immediately I realized that the dogleg offset die design accommodated making an easy realignment adjustment possible. The offset bends of the top leaf were deigned originally to create a “well” which could receive the up-curving edges of the workpiece. I doubt they were thought of as a mechanism to adjust the alignment of the top and bottom die faces. However, in fact, they do just that and it works great.
Because other deadline projects interpose, I may not actually get back to my wall sculpture for a few weeks and I won’t be able to actually test these modified dies right away but I wanted to share how the adjustment was done and soon I’ll write more about the bolted spring die design.
The images are essentially self explanatory. I clamped the “underbite” die in the vise and closed the spring with a C-clamp. Then I heated the appropriate area of the top spring with the torch and screwed down the C-clamp until the registration was correct. The “overbite” problem required two heats to shorten the lever arm by turning the tall right-angle off set into a more squat Z.
1 Bolted Spring Die
2 Die Underbite Misalignment
3 Clamped & Heated
4 Die properly aligned
5 Die Overbite Misalignment
6 Clamp, Heat & Bending Fork
7 Both Bends Completed


No comments:
Post a Comment