I wrote a bit about using touchmarks in September 2010. I'm going to expand on that as my setup has changed over the years.
The following is a guideline and isn’t written in stone but serves to help define what I consider three levels ironwork I create. First there is rather generic ironwork, small items that sell for less than $40.00 and is not signed with one of my touchmarks unless specifically requested and possible.
Next are proprietary projects that go to the gallery and are produced in limited quantities and are priced from $40.00 to a few hundred dollars. These are usually signed with the persimmon logo touchmark.
High end ironwork commissioned by clients designed to be one of a kind typically sells for more than $200.00 and is signed with the persimmon logo touchmark, DJE initials and the month and year of completion. 02 . 14 would signify February 2014. The marks are placed in an inconspicuous place unless the client requests otherwise.
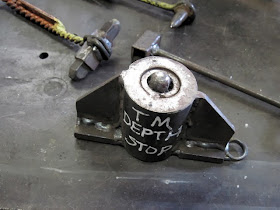
Usually the touchmark tools are held by a dedicated handled holder or tongs and struck with a hand hammer or the treadle hammer. I have also made holders so the marks can be applied using the hydraulic forging press or fly press.
In the design process I want to remember to place the touchmark before obstruction awkwardness becomes an issue. Also a thick area world best for me because the mark will show through on the opposite side of the metal if it is less than a 1/4” or so thick.
Torch heat works better for me in most cases but some marks are applied cold or with low coal fire heat.
 |
| Hand held TM tools. |
 |
| Fly press TM holder on swivel tang. |
 |
| Hydraulic forging press holder/stop. |
 |
| Face penetration depth is limited to about 1/16". |


No comments:
Post a Comment