

Yesterday I needed to make several pieces which I call "pivot/lock rods". They require a pair of opposing fuller marks to demarcate where to begin drawing each end segment on a piece of flat bar. It has been several years since I last made them and don't recall exactly how I it was done as my record keeping wasn't as good back then.
I decided it would be easiest to do on the fly press where I could sit down and get a really good view of of the register of the work piece on the bottom fuller while spinning down the top fuller. The work needs to be rather precise. The only problem was that I hadn't yet made a pair of fullers of the appropriate radius. All the completed ones were larger.
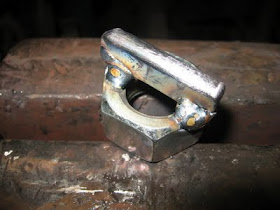
The decision was to go ahead and take the half hour or so which would be required and make this tool. Step one is see in image 01 showing a piece of 5/16" radius H13 tacked to a 7/8" nut which works perfectly as a bottom tang.
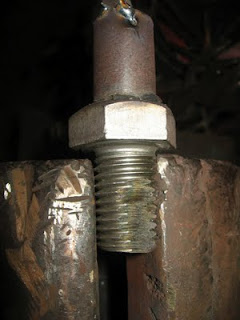
Step two is see in image 02 where I selected a 1" x 1.5" bolt as the top tang and welded a short shaft which I measured when I had the bottom tool seated. The top 5/16" radius H13 piece was tacked to the shaft.
I seated the top tool in the socket and tightened the locking nut with the rotation in the position for general use (avoiding obstruction). The end of the nut slightly flattened two of the screw threads on the top tang which were easily seen when I removed it. I used the grinder to cut away those threads so the lock bolt would rest on a flat surface in that location.
Image 03 shows all pieces lined up and tacked with two bottom flanges added to take stress away from the welds between the H13 and the nut.
The final step was to MIG weld all around and add a short handle to the bottom tool to make it easy to rotate into exact alignment with the top tool which is locked.
It did take about 30 minutes to make the tools but it only took a couple of minutes to mark the six work pieces perfectly and the tools will be available for other jobs now.
The Smithing Magician http://www.britishblades.com/forums/showthread.php?17493-Smithing-Magician-Guillotine would be my next best choice for this job. I have it set up for the treadle hammer and the light in that workspace isn't as good as at the fly press and my angle of view is also not as favorable. I could have placed the Smithing Magician in a vise and struck with a hand hammer
Actually there are quite a few ways to skin this cat but mostly I wanted to show a quick way to make fly press dies.

No comments:
Post a Comment