Contents

Friday, October 28, 2011

Making Black Lag Screws


I wrote some about this back in late May. Today the issue came up again as I had to make about 100 black lag screws, 5/16” x 1.5” and 5/16” x 2.5” and decided to take a couple of images to better explain the technique. Since almost everything I make has a black finish I like to make sure the mounting hardware matches. I have square head hardware to use when it seems most appropriate but most things mount with standard hex head lag screws which I modify to get the right color finish.


Step one is to remove the galvanizing with a 10 minute soak in hydrochloric acid. I explained that last April in “The Pickling Bucket”.


Step two is rinsing with water and drying. A light rust color appears.


Step three is shown in the image showing the screws inserted in the vise jig I use to hold nine at a time to dress the heads.


Step four is to polish off the factory lettering on the heads with a flap disc on an angle grinder.


Step five is to heat each head with the torch using a slightly reducing flame to barely melt the surface surface and glaze to remove the abrasive streaks.


The final step is to spread them out in a pan and spray them with Minwax clear satin polyurethane.


I got this tip back in my woodworking days. When I’m gathering things to do a mounting project I stick the screws into a toilet bowl wax ring. The urethane wax is an excellent lubricant which, in addition to a pilot hole, makes screw insertion easy. Here is a picture of the type of ring I’m describing if it’s not already clear.

http://www.oatey.com/apps/catalog/instance_assets/assets/Photo/Wax_Ring_31195.jpg


http://www.persimmonforge.com/

Wednesday, October 26, 2011

How to Find A Hook Jig


It is a disturbing fact that from time to time I need something I can’t find. It’s disturbing because I’ve put a lot of time and effort into making sure that doesn’t happen.


I have been requested to make a coat rack similar to one I made several years ago. Actually, it was quite a few years ago. Back then I didn’t keep any records, so this was like starting from scratch and figuring it out all over again. I really don’t like that, but I can do it.


First, I queried my inventory and found where two coat hooks jigs were located. I found them and one was made for a very specific project which I probably will never repeat and the other was an enigma so I disassembled it.


So, not actually finding a suitable hook jig, I designed the type of hook I needed for this job and did two test pieces and made a new jig to duplicate the prototype hook.


This is a summary of what I did. First I cut 8” of 3/8” square bar and forged a 2” fishtail taper then rolled it into a scroll. Then I cut a piece of angle, a piece of pipe and a piece of round bar and welded up the radius jig. With the mass of the fishtail hooked on the round bar I torch heated as I pulled the radius with a cheater pipe. When the tangent looked right I welded on another little piece of angle as a stop. I made a twisting wrench by heating a piece of pipe which I thought would slip over the square stock when forged to square shape. With torch heat I made a snug fit onto a short piece of 3/8” square then used that piece to MIG weld on as the T handle. I torch heated the hook in the little triangular gap between the pipe and the angle stop and added a 180º twist.


Later, I’ll swell the top end with half face blows and punch a rivet hole so the hooks can be fixed to the mounting bar,


When I finish I’ll stamp a name, such as, "coat hook" and the A02 grid number on the jig designating what it’s for and where it will hang. Then I'll record that information on the inventory spreadsheet. It’s the old “a name and a home” strategy again. Next time, maybe I’ll be able to find it.


Tuesday, October 25, 2011

Coal Dust Punch Lubricant


This week I made some forming dies with the hydraulic forging press. The depressions were sunk in several heats with progressively larger top tool positive forms. Slight upsetting and entrapment of the pushing form is always a possibility and a problem if it occurs. I thought about how I sometimes use a pinch of coal dust in the hole when hot punching to prevent the punch from sticking and how sometimes dipping the punch in grease or Anti-seize also helps.


When I first was setting up the shop I needed a 55 gallon drum to build a small tumbler. I went to a local bakery, which gave me the drum, but it still had about 5 gallons of grease inside. They said it was edible grease - Linoleic acid - and was really high quality. I scraped it all out and filled a 5 gallon drum and filled several more clear plastic jars with it and have used it ever since for general lubrication.


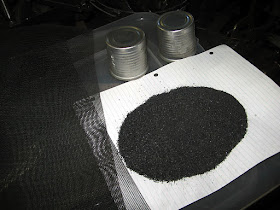
I mixed some of the grease with some sifted coal dust about 50/50 and filled two small cans. It seemed to entirely prevent sticking as I worked with the press so I’ll continue using it. Apparently the escaping gases from the combusting grease prevent the punch from binding.


I looked up linoleic acid http://en.wikipedia.org/wiki/Linoleic_acid and found it is a colorless liquid at room temperature and what I scraped from the drum was a pale green soft solid so it must be mixed with something else. Any cooking grease or canola oil probably would work too. Use good ventilation. I have no idea what is in the fumes.


http://www.persimmonforge.com/

Saturday, October 22, 2011

Carhartt Shirts and Fried Green Tomatoes

It’s fall. Every creature is looking for winter quarters. I ran a blacksnake out of the studio a few days ago. The monarch butterflies are gone. Tree frogs have gathered near the creek. The turkey vulture and herring gulls migrations have passed through and we’ve had one light frost now. It came on about the expected date and nipped the tender plants. I went out at dusk in the windy chill and picked the green tomatoes. It was a poor garden year for us with about thirty days over 100º and very little rain so there was only enough for a couple of servings of fried green tomatoes. I was worried that this might be the first year in my life without tasting them. Betty fixed them just right and they were great.


I’m pretty tolerant of cold and probably only put on a coat a half dozen times a winter but I like sweaters, jackets and my Carhartt sandstone twill long sleeve work shirts. I have several and they are well worn and getting faded and one has a big elbow patch but they are comfort clothes as sure as fried green tomatoes are comfort food.


I love autumn and today I paid attention to the beautiful colors in the sugar maples, the Virginia creeper and the poison ivy vines. Some ripe persimmons are dropping now and, while the crop is sparse this year, the flavor is wonderful.


It’s perfect forging weather and I treasure every day of it.


http://www.persimmonforge.com/

Flat Bar Scroll End


What appeals to one client won’t necessarily appeal to another. That, to me, is a good thing as it drives creativity. Several years ago I made a simple flat bar coat rack with four hooks for a client. I textured the bar but it still looked rather generic so I added scroll ends. Naturally, they didn’t like the scrolls and wanted just the plain flat bar.


The scroll end hanger eventually wound up in a gallery where it sold recently. As soon as it was sold I was requested to make another one like it. So much time had passed that I couldn’t recall immediately how I made the scroll but I remembered it was simple to accomplish.


I got out a scrap of tar paper and cut it in the shape of the 2” wide flat bar and confirmed it just required trimming the end off at a 45º angle, texturing both sides and rolling the scroll by pulling the point down while twisting. I thought a reversing scroll might be interesting so I rolled one on the same piece of tar paper and snapped an image of it for the record.


The roll of tar paper was purchased 15 years ago and I have used it to make numerous patterns and I still have most of the roll left. The soapstone, silver pencil, correction fluid lines show with nice contrast when drawing. But, I still need the large white grid paper pad for charcoal sketching.


http://www.persimmonforge.com/

Friday, October 14, 2011

Blacksmith Dirt


On Saturday a crew is coming for an interview and some filming in the studio and I have been trying to do a little cleanup and picking up to make it look less scary.


My wife says the studio produces a special kind of dirt. The most stubborn variety. It's true. My hands only look respectable after several days of vacation.


I suspect most of it is coal dust, soot, ash and the various iron oxides of fire scale. The tumbler is responsible for processing the most tenacious black stuff as it removes all manner of surface coatings such as paint, lacquer, oil, fire scale, rust, and more. I especially dislike having to deal with pickled and oiled stock.


The sticky products I handle such as silicone caulk, glue, Permalac, Polyurethane, paint, sanding sealer, oil, Goop, etc. serve to attach the blackness nearly permanently to skin cells.


Even after I empty 20 pounds of black powder the place isn’t going to look clean to a new visitor and even I won’t be able to tell much difference but it will be 20 pounds cleaner.


The dirt is generated in the forge room and tumbler room but travels everywhere throughout the shop. Putting the tarp and drum shell around the tumbler helped some. Probably I need to get a vacuum attached to the tumbler. That would be a good project for the winter.


In reality I know I’m never going to get a clean workspace - it’s a blacksmith shop. Francis Whitaker was shown a piece of work and asked, “Is this straight enough?” He responded, “There is no such thing as straight enough. It is either straight or not.” The same goes here. Clean enough is never clean.


http://www.persimmonforge.com/